


IMPORTANT INFORMATION YOU MUST READ BEFORE YOU START! ATTENTION! If you only see a single device in the web UI, you must repeat the process, rebuild the gold image and deploy it again to the affected endpoints as soon as possible. For any questions, contact Technical Support. |
Introduction
In large networks with many similar computers, you can automate the process to install the operating system and other software with a gold image. This is sometimes referred to as a master image, base image, or clone image. You then deploy the gold image to all computers on the network, which eliminates most of the manual work required to set up a new computer. To generate a gold image, install an up-to-date operating system with all the software that users might need, such as security tools, on a computer on your network.
This article offers a step-by-step walkthrough of how to install Panda Security solutions for Linux on Aether platform in persistent and non-persistent Virtual Desktop Infrastructure (VDI) environments. Due to their characteristics, virtual computers or instances require you to follow a specific procedure to ensure that the images or templates to be used in virtual environments are up to date, and don't have a previously assigned machine ID so that, when a virtual computer is started, it is uniquely registered in the Web UI. In environments with very specific characteristics, you may need to follow the recommendations provided by the virtualization vendor to adapt general instructions to your needs. For a customized solution, contact Panda Security Technical Support.
The installation procedure requires the prepation of a template (for persistent environments) or a gold image (for non-persistent environments) that will be later deployed to the virtual computers on the network.
In persistent environments, information stored on the computer's hard disk persists between reboots. Therefore, you must install an updated version of the operating system with all the programs that users need and then create the template with your product protection updates configured. Click here to see the Procedure for Persistent Environments.
In non-persistent environments, two security configuration profiles will be created; one to update the gold image when it is prepared and for maintenance purposes, and one to disable updates when the gold image is running, as it is not appropriate to update the client software when the computer's storage system reverts to its original state with each reboot. Click here to see the Procedure for Non-Persistent Environments.
It is very important to follow this procedure closely to:
- Ensure engine and knowledge updates.
- Optimize resource and bandwidth consumption in non-persistent environments.
- Ensure virtual instances are uniquely identified.
Prerequisites
- In persistent environments, computers must have fixed MAC addresses.
The computer used to generate the template or gold image must have an Internet connection. - There are two versions of the tool, and both must be run as root:
- Endpoint Agent Tool for Linux
- Endpoint Agent Tool for Linux NO DEPS (without dependencies)
Compatibilities
Generally, the procedure described in this document works with the following types of virtual machines:
- VMware Workstation
- VMware Server
- VMware ESX
- VMware ESXi
- Citrix XenDesktop
- XenApp
- XenServer
- MS Virtual Desktop
- MS Virtual Servers
Phase 1: Prepare the computer with the template
Follow these steps to prepare the computer where the template is created.
- Install or update the operating system with the user's applications.
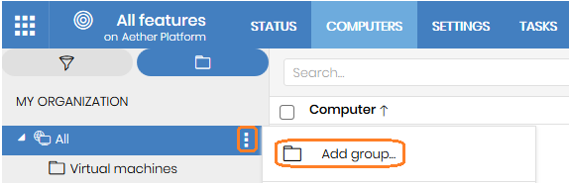
- From the product console, create group called Virtual machines where you host the template and the virtual computers. To do so, follow these steps:
- Click on the Computers tab.
- Select My organization from the left pane.
- Select Add group.
- Create a settings profile with the automatic updates of Panda Adaptive Defense 360 enabled. To do so, follow these steps:
- Click on the Settings tab.
- Select Per-computer settings.
- Click on Add.
- Make sure the Automatically update the Panda Adaptive Defense 360 on computers toggle is enabled.
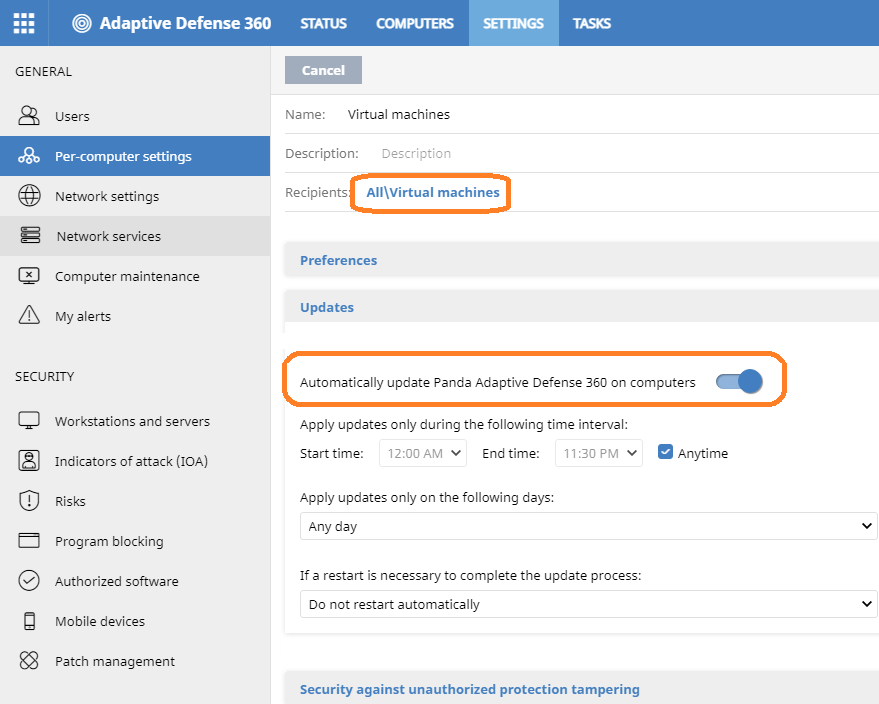
- Assign these settings to the Virtual machines group.
- Click on the Settings tab and select Workstations and servers within the Security section on the left pane.
- Click on Add and configure the settings for future updates of the image with automatic knowledge updates enabled.
- Expand General and enable the Automatic knowledge updates toggle.
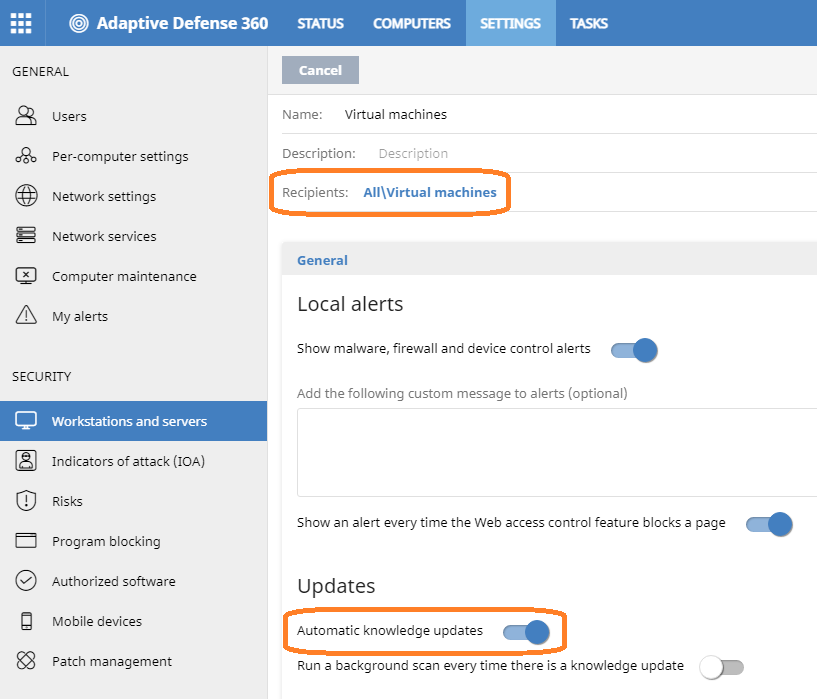
- Assign these settings to the Virtual machines group.
- Install the agent and the protection on the Virtual machines group:
- Click on the Computers tab, select the Virtual machines group and click on Add computers. The installer will download.
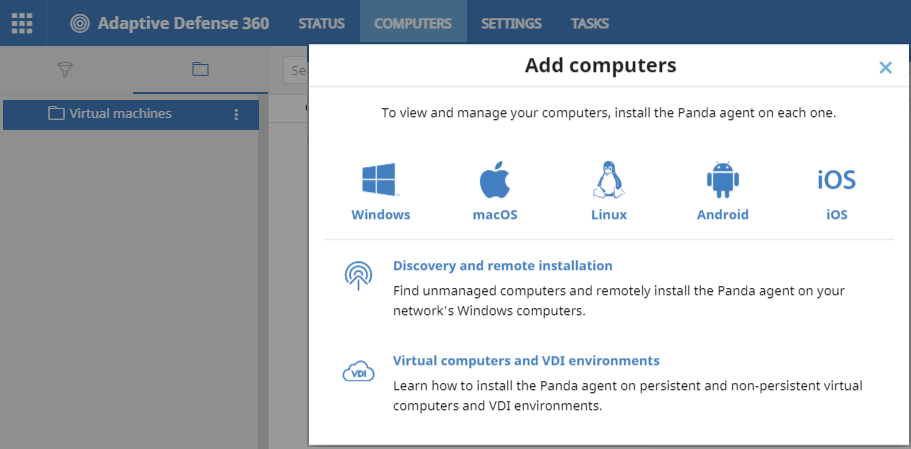
- Install the agent on the template and wait for the progress window to finish.
During that time, the protection will be automatically installed, configured and updated. After the installation is completed, the computer will appear on the list of protected computers in the console, with a green icon. The computer's protection and knowledge will be updated.
- Click on the Computers tab, select the Virtual machines group and click on Add computers. The installer will download.
- Download Endpoint Agent Tool for Linux or the Endpoint Agent Tool for Linux NO DEPS and extract it on the computer with the template.
- Open the EndpointAgentTool folder and access the file for your operating system.
NOTE: In the case of the NO DEPS tool, you must copy the EndpointAgentTool file on the /usr/local/management-agent/bin/ path. - Run this command line to restart counters and detections and to update settings and server tasks:
sudo ./EndpointAgentTool -d -c -cmd - If the computer is protected with AntiTamper, add the password after the atp parameter.
sudo ./EndpointAgentTool -pei -atp:antitamperpassword
ATTENTION! This step is critical to generate a specific ID for each virtual computer.
- Open the EndpointAgentTool folder and access the file for your operating system.
- Disable the Panda Endpoint Agent service so it doesn't restart automatically before the name of the virtual instances changes.
Once the template is created, you can modify the type of Panda Endpoint Agent service startup, either through scripts or other tools.
Procedure for Non-Persistent Environments
Phase 1 - Prepare and generate the gold image
- Install/update the operating system with the user's applications.
- From the product console, create the group that will host the gold image (Gold or template image group) and the virtual machines (Virtual machines group).
- Gold or template image Group
- Click the Settings tab, select Per-computer settings and create a profile for future image updates.
- Make sure the Automatically update Panda Adaptive Defense 360 on computers toggle is enabled.
- Configure the Automatic restart both workstations and servers option to ensure the computer is updated.
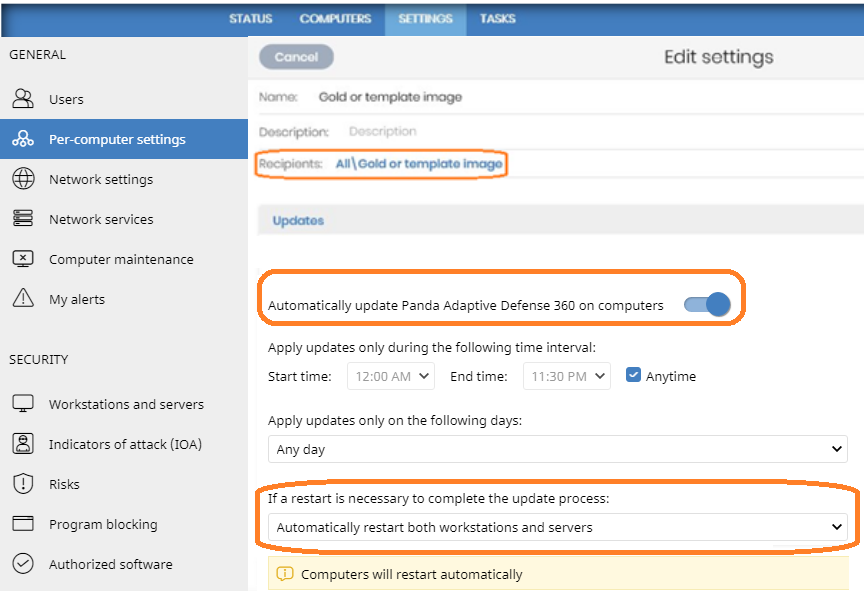
- Assign these settings to the Gold or template image group.
- Click the Settings tab, select Workstations and servers in the Security section to create a configuration for future image updates.
- Make sure the automatic knowledge updates are enabled.
- Assign these settings to the Gold or template image group.
- Virtual machines Group
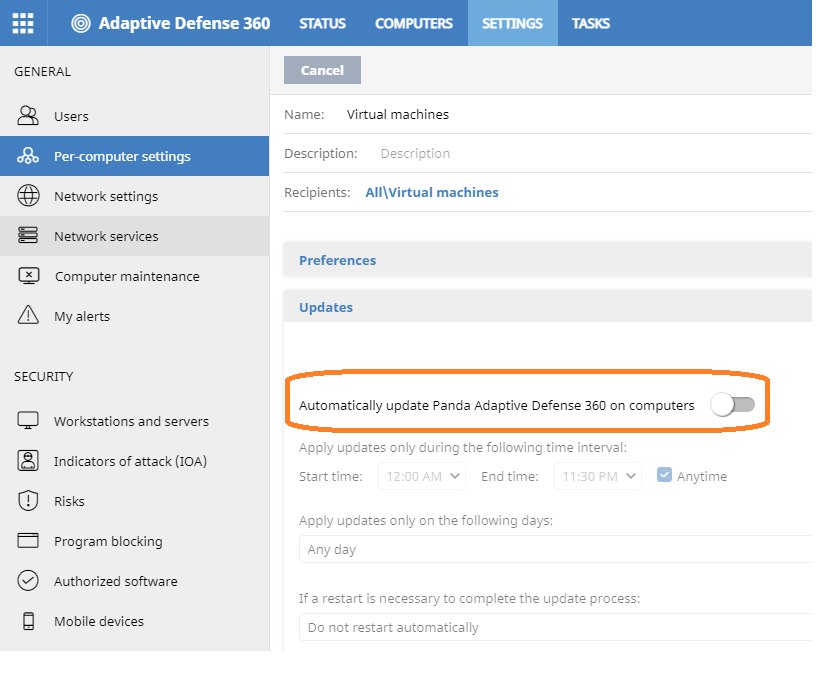
Virtual instances are based on the updated gold image. To optimize the VDI server's resources and reduce bandwidth usage, disable updates by following these steps:- Create a Per-computer settings profile that has the Automatically update Panda Adaptive Defense 360 on computers toggle disabled, and assign it to the Virtual Machines group.
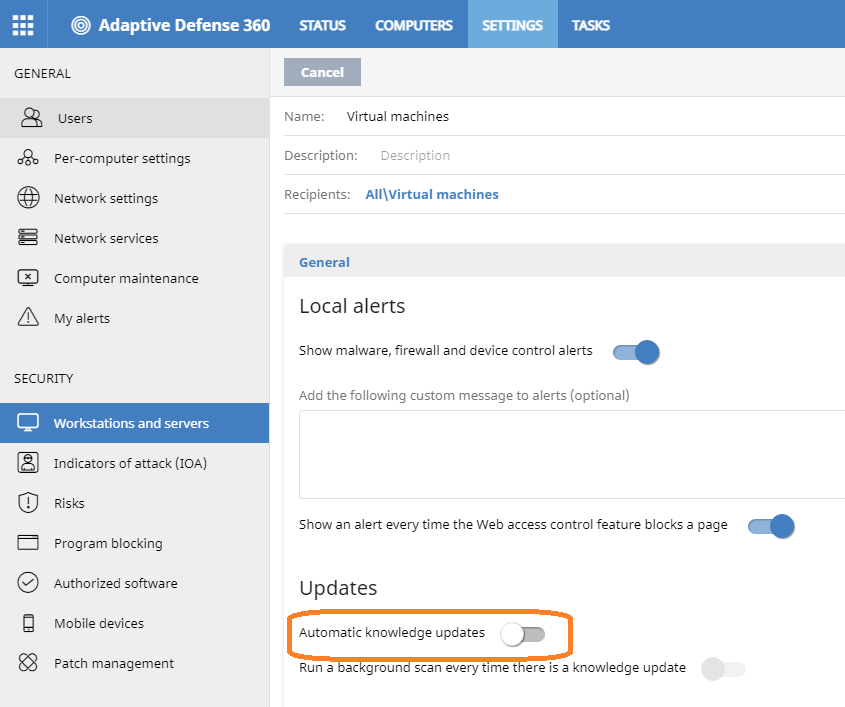
- Go to Workstations and servers in the Security section of the Settings tab, disable Automatic knowledge updates, and assign those settings to the Virtual Machines group.
- Create a Per-computer settings profile that has the Automatically update Panda Adaptive Defense 360 on computers toggle disabled, and assign it to the Virtual Machines group.
- Gold or template image Group
- Install the agent and the protection on the Virtual Machines group in order to generate the gold image:
- Go to the Computers tab, select the Virtual Machines group, and click Add computers. This will download the installer.
- Install the agent on the machine used to create the gold image and wait for the progress window to finish. During that time, the protection will be automatically installed and configured.
After the installation is completed, the computer will appear on the list of protected computers in the Web UI.
- Download the Endpoint Agent Tool for Linux ot the Endpoint Agent Tool for Linux NO DEPS and extract it on the computer with the gold image.
- Open the EndpointAgentTool folder.
NOTE: If it is the NO DEPS version, you must copy the EndpointAgentTool file on the /usr/local/management-agent/bin/ path. - Type in this command line to send counters and detections, and to update settings and tasks on the server:
sudo ./EndpointAgentTool -d -c -cmd - If the computer is protected with AntiTamper, write the password after the atp parameter from the command line:
sudo ./EndpointAgentTool -pei -gi -atp:antitamperpassword
ATTENTION! This step is critical to ensure that each virtual instance is uniquely identified in the Web UI.
- Open the EndpointAgentTool folder.
Once the template has been created, you can modify the type of startup of the Panda Endpoint Agent service, either via script or with specific tools of the virtualization environments themselves.
Phase 3 - Maintenance of the gold image
The agent, the protection, and the signatures of the gold image created must be updated frequently, at least once a month. These updates are essential to ensure maximum protection against the new attack techniques developed by hackers. Follow these steps to update the gold image:
- Start the machine where the gold image is installed.
- From the Web UI, move the machine with the gold image to the Gold or template image group so that it receives the appropriate settings with automatic updates of the engine and knowledge.
- Download the Endpoint Agent Tool for Linux or Endpoint Agent Tool for linux NO DEPS and extract it on the computer with the gold image.
- Open the EndpointAgentTool folder.
NOTE: If it is the NO DEPS version, you must copy the EndpointAgentTool file on the /usr/local/management-agent/bin/ path. - Run this command to update the agent and the protection in case of new versions available:
sudo ./EndpointAgentTool -su - Run this command line to update protection signatures:
sudo ./EndpointAgentTool -ku - Run this command line to send counters and detections and to update settings and tasks on the server.
sudo ./EndpointAgentTool -d -c -cmd - If the computer is protected with AntiTamper, write the password after the atp parameters from the command line:
/usr/local/management-agent/bin/EndpointAgentTool -pei -gi -atp:antitamperpassword
ATTENTION! This step is critical to ensure that each virtual instance is uniquely identified in the Web UI.
- Open the EndpointAgentTool folder.
- Disable the Panda Endpoint Agent service so it doesn't restart automatically bedore the name of the virtual instances changes.
Verify Procedure
It is essential to ensure that you have followed the procedure correctly.
- View non-persistent computers
Panda Adaptive Defense 360 uses the FQDN (Fully Qualified Domain Name) to identify computers whose IDs have been deleted using the Endpoint Agent Tool and are marked as gold image.
To get a list of non-persistent VDI computers,follow these steps:- From the top navigation bar, go to Settings.
- Click Computer Maintenance from the left pane.
- Go to the VDI Environments section.
- Click the Show non-persistent computers link.
- The Computers list is displayed, with the non-persistent computers filter applied.
- View persistent computers
- From the top navigation bar, select Computers.
- Verify that all your cloned devices are correctly displayed in the web UI.
IMPORTANT! If you see a single device, you must remove the device from the Computers list and start the procedure from scratch, that is, rebuild the gold image and deploy it again to the affected endpoints.
Manage Licenses
If you follow the process correctly and delete the agent ID by configuring the gi parameter as indicated, every time a new computer is started, the system will calculate its ID and will determine if it is a new computer or an existing one.
In non-persistent environments, if the maximum number of machines that can be active simultaneously for non-persistent images is set, the server will manage licenses automatically, provided there are available licenses and the number of concurrent machines is not exceeded.
In persistent environments, if there are multiple machines that are no longer used, delete them from the database in order to free up licenses just as you would do with physical machines. This can be done from the Aether console, by selecting all machines to delete and clicking the Delete button, or individually via the context menu of each machine to delete.
Related Articles
How to create an image for Windows persistent and non-persistent environments (VDI) with products based on Aether