VPNs encrypt all your internet traffic for maximum security, while proxy servers only reroute traffic for specific applications, leaving your data unencrypted. VPNs are a better choice for strong privacy and security.
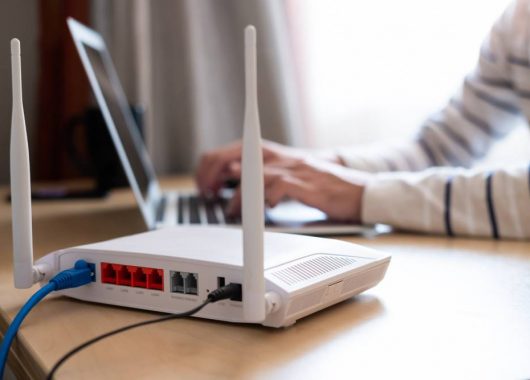
Did you know that 105 million Americans use (or are aware of) private networks? If you’re one of them, congratulations on taking the first step toward a secure online browsing experience. If not, you’re here anyway — we’ve got you covered. One of the trickiest things about virtual networks is deciding what type of online security to use. VPNs and proxies are two popular options.
Proxies and VPNs can both be used to hide your IP address and help you access online content securely. However, both offer different benefits that may sway you to pick one over the other.
Keep reading to learn about the differences between a proxy vs. VPN and which one could be best for your online security needs.
What Is a Proxy Server?
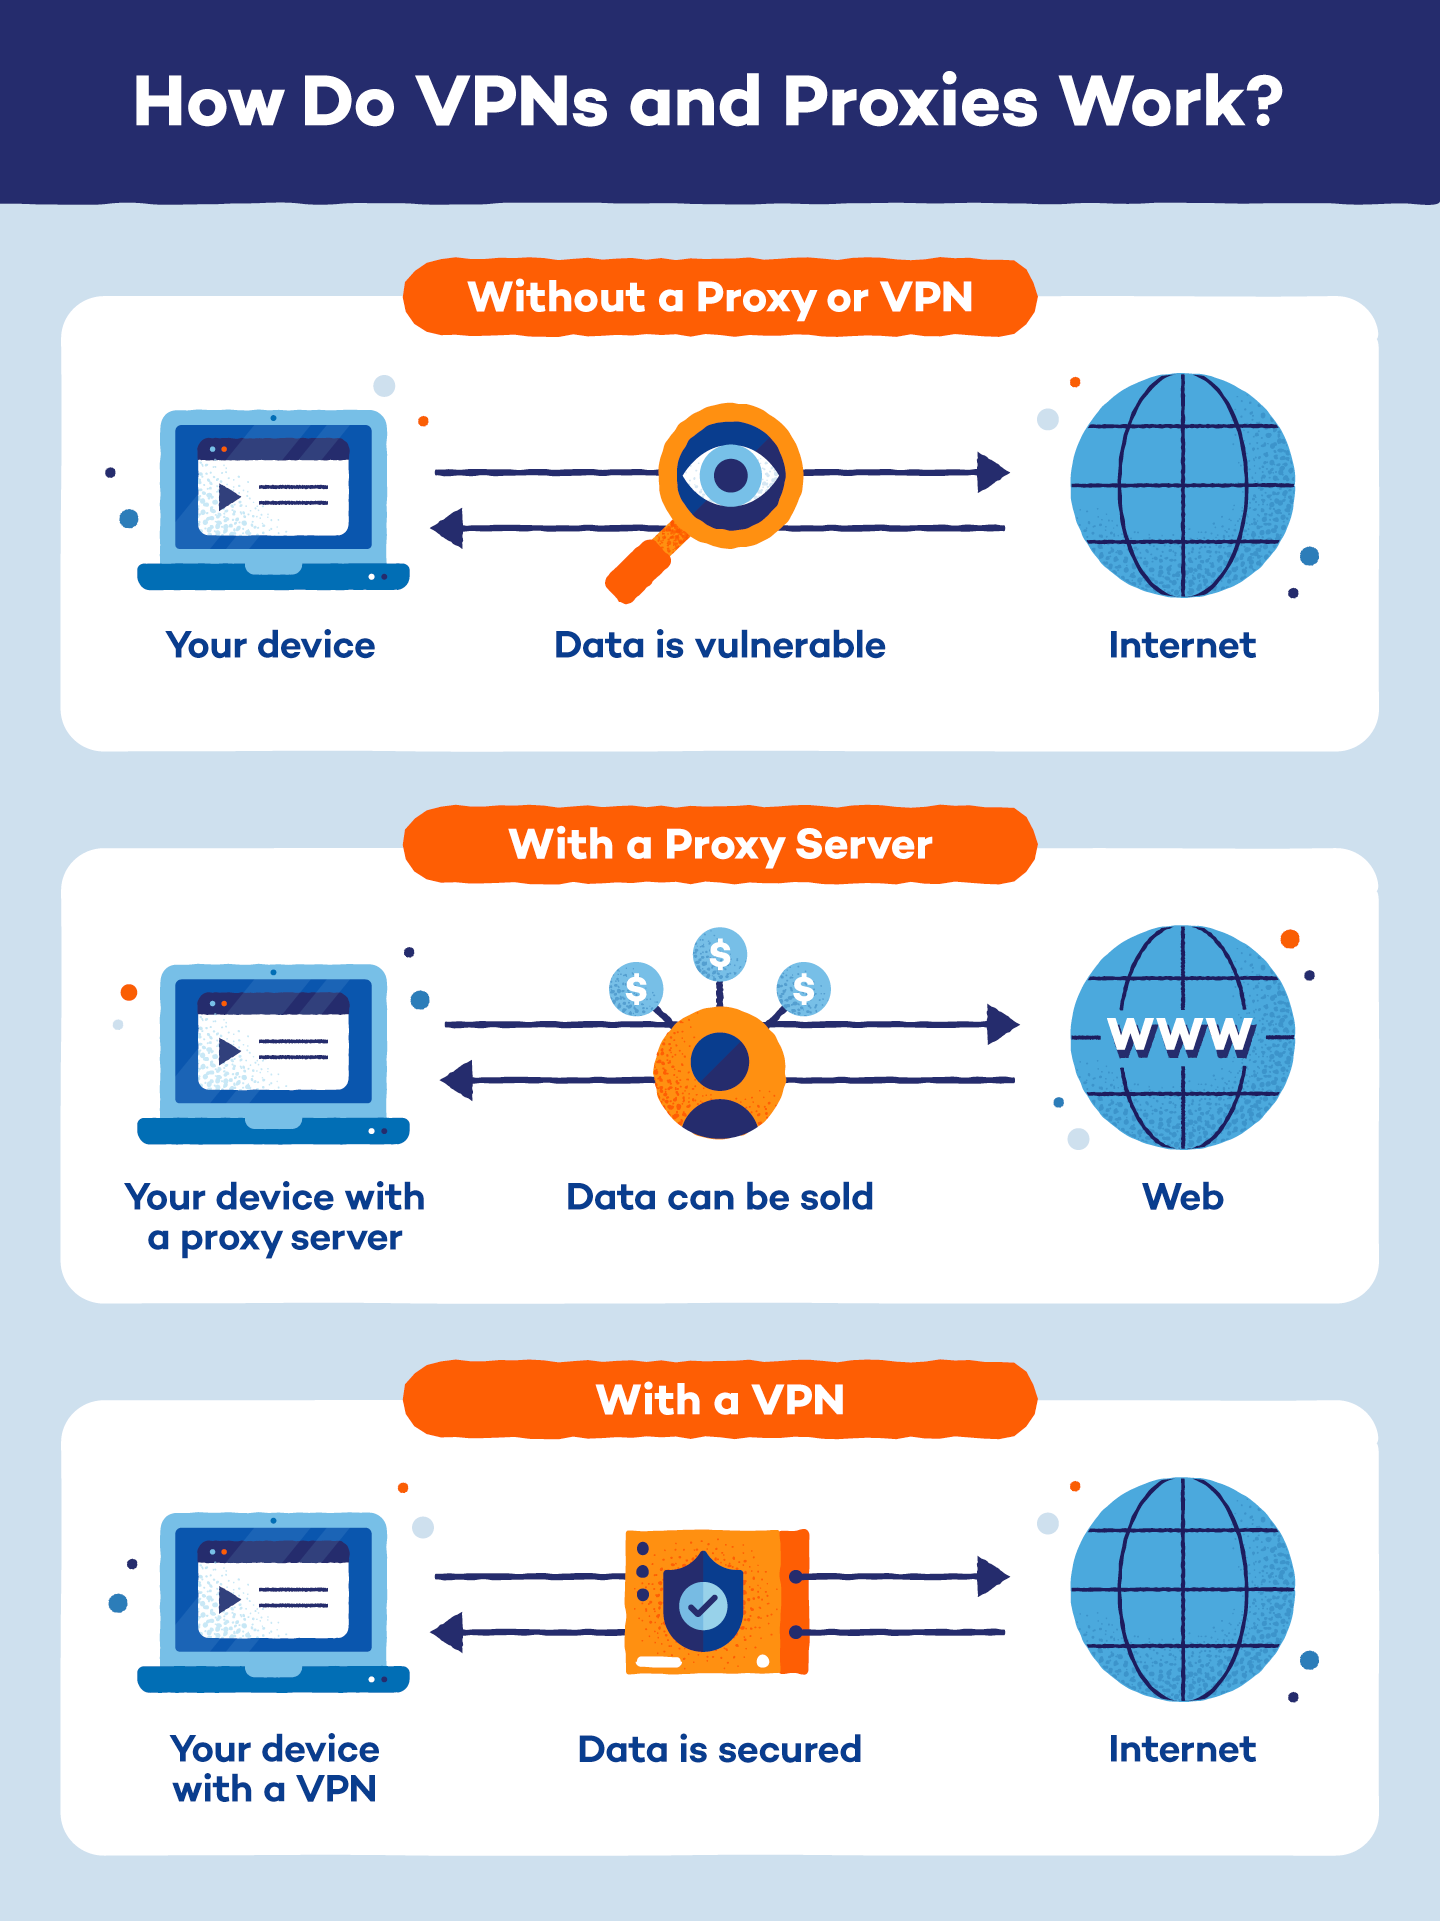
A proxy server acts as a middleman between your device (such as your computer) and the internet. Proxies allow you to browse the web safely and anonymously. You can even use them to access content that is blocked in your region.
However, there are also some downsides to using proxies, such as security and limited functionality. Proxy servers do not encrypt your traffic, making it possible for data traveling between your computer and the proxy to be intercepted. Also, some proxy servers only work with specific types of traffic, like web browsing.
You might be familiar with several common types of proxies, such as:
- Transparent proxy: A transparent proxy server forwards your internet traffic without hiding your IP address. These are often used in organizations to filter content or improve network performance, but they offer no anonymity.
- HTTP proxy: This type of proxy focuses specifically on web traffic, anonymizing your IP address when browsing websites.
- SOCKS5 proxy: A SOCKS5 proxy anonymizes your IP address to some extent. Unlike HTTP proxies, SOCKS5 can handle various internet traffic types, including email, video games, streaming YouTube videos and file sharing.
- Forward proxy: It sits between your device and the internet, routing all your outgoing traffic through it. You can use this type of proxy for filtering content, improving performance or anonymizing your browsing.
- Reverse proxy: Unlike the others, a reverse proxy sits in front of web servers, acting as a load balancer. It distributes incoming traffic among multiple web servers to improve performance and security.
- Distorting proxy: A distorting proxy goes beyond hiding your IP address. It might modify data packets to make it even harder to track your online activity. However, this can also lead to compatibility issues with some websites.
- Datacenter proxy: This proxy originates from data centers, offering fast speeds and reliability. However, since it comes from a limited pool of locations, it is not ideal for strong anonymity as it can be easily traced back to the data center.
- Residential proxy: Using IP addresses from real devices like home computers or smartphones, residential proxies provide a higher level of anonymity compared to datacenter proxies because they appear to be regular internet users.
How Does a Proxy Server Work?
As mentioned above, a proxy server acts as a middleman between your device and the internet. Here’s what goes on behind the scenes:
- Intercepting requests: Imagine you’re in a library and the librarian (proxy server) is fetching books (webpages) for you. Similarly, when you want to visit a website, your device sends a request to the proxy server first.
- Forwarding requests and receiving responses: The proxy server then takes your request and forwards it to the actual website (library server). The website sends the response (webpage content) back to the proxy server.
- IP address masking: This is where the magic happens! Upon receiving the request, the website detects the IP address of the proxy server rather than your IP address. This masks your identity and makes your browsing appear to originate from the proxy server’s location.
- Delivering the response: Finally, the proxy server receives the website’s response and forwards it to your device, allowing you to view the requested web page.
Proxy servers can also act as caches, storing frequently accessed web pages or data. In essence, a proxy server acts as a gatekeeper, anonymizer and sometimes even a speed booster for your internet browsing.
What Is a VPN?
A VPN forms a secure, encrypted tunnel between your device and the internet, making all your data traffic unreadable to anyone attempting to intercept it. This means that with a VPN, every bit of your internet traffic is encrypted, not just the traffic from specific applications like web browsers.
There are two main types of VPNs used for different purposes:
- Remote access VPN: It allows you to securely connect to a private network, like your company’s network, from a remote location like your home or a coffee shop. Once connected, you can access resources on the private network as if you were physically there. This is particularly useful for employees who need to work remotely.
- Site-to-site VPN: It creates a secure tunnel between two separate networks, often used by businesses to connect their offices together over the public internet. This allows secure communication and data sharing between the two locations.
How Does a VPN Work?
A VPN, or Virtual Private Network, works by creating a secure connection between your device (like a computer, smartphone, or tablet) and the internet. Think of it as a private tunnel that shields your online activities from prying eyes. When you use a VPN, your internet traffic is encrypted, meaning it’s turned into a code that’s nearly impossible for anyone to read. This encryption happens before your data leaves your device, ensuring that anyone trying to intercept your information won’t be able to understand it. As a result, your online activities, such as browsing websites, sending emails and streaming videos, remain private and secure.
Proxy vs. VPN: Key Differences
While both proxies and VPNs offer a degree of anonymity online, they differ significantly in how they protect your privacy and secure your data.
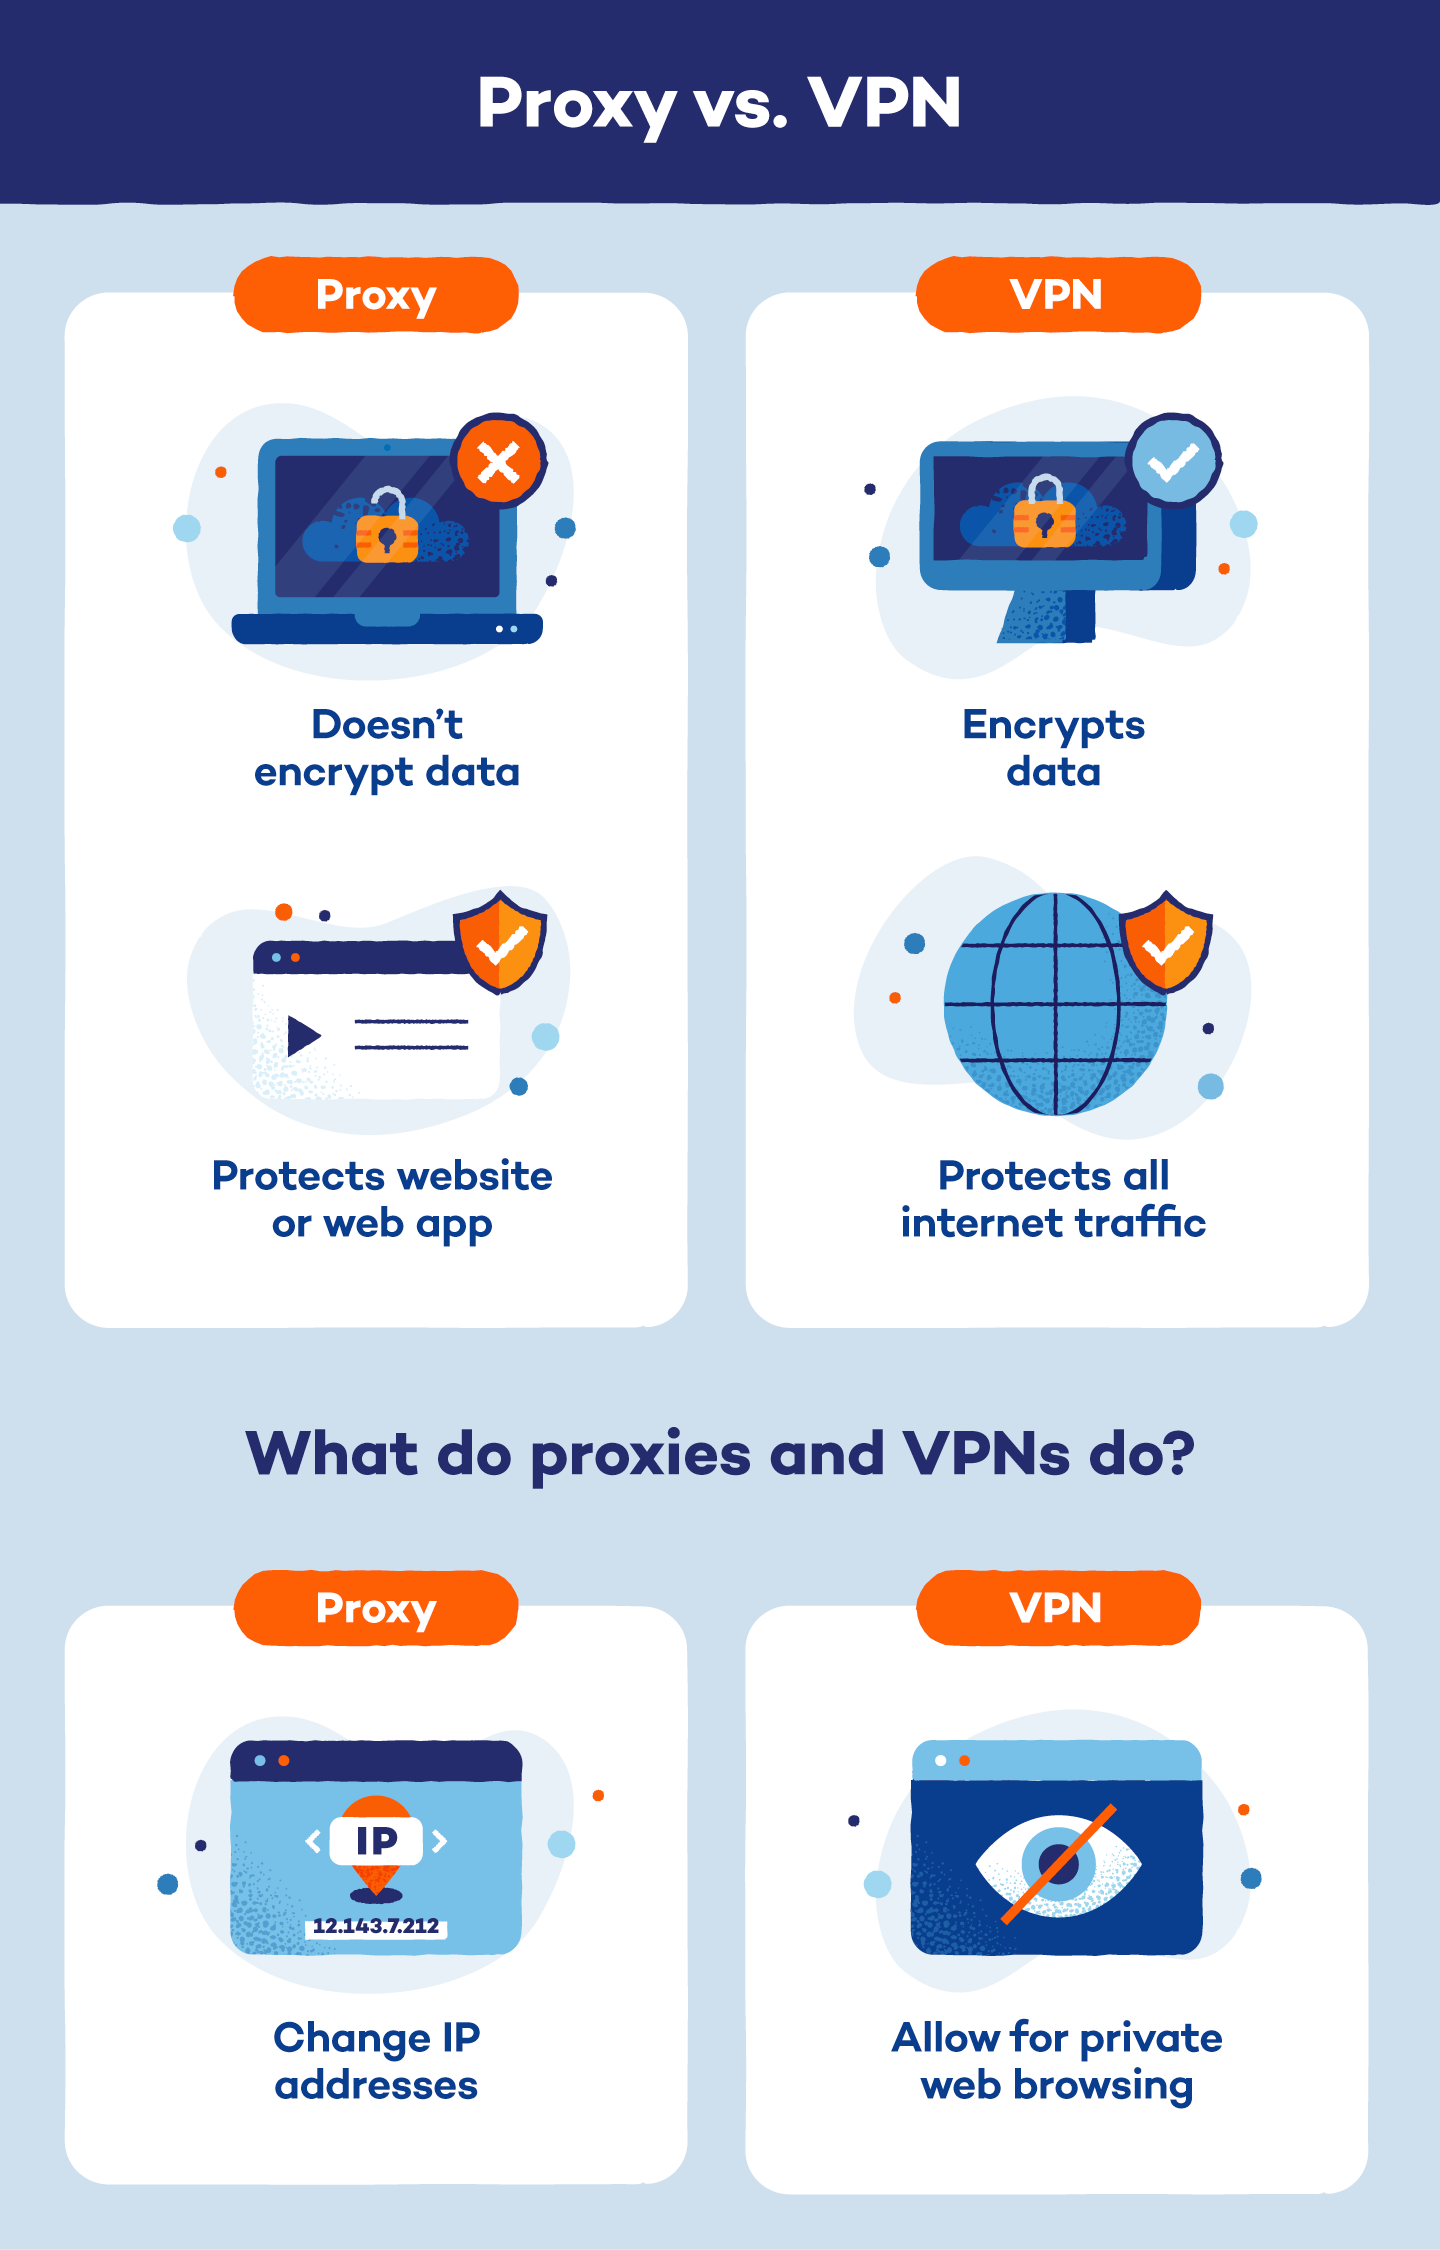
1. Encryption
- VPN: It encrypts all your internet traffic, protecting your data from prying eyes, such as hackers on public Wi-Fi or even internet service providers (ISPs) who might be monitoring your activity.
- Proxy: A proxy doesn’t encrypt your data. While it hides your IP address, anyone monitoring the connection between you and the proxy server can see your unencrypted traffic.
2. Security
- VPN: A VPN provides a more robust security solution due to encryption. This is crucial for activities like online banking or using sensitive websites where data security is paramount.
- Proxy: It offers limited security as your data remains unencrypted. It’s not recommended for sensitive tasks or when strong privacy is needed.
3. Speed
- VPN: Encryption introduces additional processing, potentially slowing down your internet connection. However, reputable VPN providers typically offer decent speeds.
- Proxy: It can potentially be faster, especially free proxies, as there’s no encryption involved. However, they can also be slower due to overloading from many users.
4. Traffic Coverage
- VPN: It reroutes all your internet traffic through the VPN server, protecting everything you do online.
- Proxy: A proxy typically works on an application level, meaning it might only anonymize traffic for a specific program like your web browser. Other applications might not be covered.
5. Cost
- VPN: Many VPN providers offer free or low-cost options, but premium services with better features and security typically require a subscription.
- Proxy: Free proxies are readily available, but they come with security risks and potential privacy concerns. Paid proxies offer better performance, but they still lack the encryption of a VPN.
6. Reliability
- VPN: Paid VPN services generally offer more reliable connections with better infrastructure and support.
- Proxy: Free proxy servers can be unreliable and prone to frequent connection drops due to high user volume or lack of maintenance.
| Feature | Proxy Server | VPN |
|---|---|---|
| Encryption | No encryption; your data travels unencrypted | Encrypts all your internet traffic, protecting it from interception |
| Security | Lower security — leaves data vulnerable | Higher security thanks to encryption |
| Speed | Potentially faster, especially free proxies | May experience a slowdown due to encryption, but reputable providers offer good speeds |
| Traffic Coverage- | Specific applications (e.g., browsers) only | The VPN server routes all of your internet traffic |
| Cost | Free or low-cost options available | Typically requires a subscription for premium features and security |
| Reliability | Can be unreliable, especially free proxies, due to overloading | Generally more reliable connections, especially with paid VPN services |
| IP Masking | Hides your IP address from websites you visit | Hides your IP address and makes it appear as if you’re browsing from the VPN server’s location |
| Data Privacy | Limited data privacy — your activity can be seen by the proxy server | Strong data privacy — your data is encrypted and anonymized |
| Best for- | Basic IP masking for occasional browsing or bypassing geo-restrictions on non-sensitive content | Strong online privacy and security for sensitive tasks like online banking, using public Wi-Fi or bypassing restrictions |
Which Server Should You Choose?
If you need strong security and privacy for everything you do online, choose a VPN. It encrypts all your traffic, protects your data from nosy onlookers and offers full coverage for all your web apps and websites.
If you just need occasional IP masking for a single website and don’t mind your activity being logged, a proxy server might suffice. It’s free, hides your IP for one website, but offers no encryption and limited coverage.
Proxy servers are typically free, while VPNs usually require a subscription fee. Free VPNs exist, but they often come with limitations like data caps, slower speeds or intrusive advertising. For robust security and reliable performance, a paid VPN subscription is recommended.
Secure Browsing With Panda VPN
For comprehensive online security and privacy, a VPN is the clear winner. It goes beyond what a proxy can offer by encrypting all your internet traffic and anonymizing your browsing activity.
With a VPN, you can safeguard your online experience with strong encryption and many other features. Advanced VPNs like Panda Dome even offer malware protection, blocking potential threats before they can reach you.
Panda VPN offers robust protection against all types of cyberattacks with constantly updated servers to ensure you’re always one step ahead of evolving online threats. Browse securely with Panda VPN!
Proxy vs. VPN FAQ
We’ve compiled answers to frequently asked questions about how VPNs and proxies work and compare.
Is a VPN Better Than a Proxy?
A VPN is better than a proxy server for several reasons. VPNs encrypt all of your internet traffic, while a proxy server only encrypts the IP address of one web app or website. Another advantage of paid VPNs is that your data can’t be sold to third parties for advertising purposes, whereas with a free proxy server, there’s a high chance your traffic data will be sold.
Is a Proxy the Same as a VPN?
A proxy server isn’t the same as a VPN. VPNs can encrypt all types of web data, whereas a proxy can only encrypt the IP address of an individual website or app.
Can I Use a Proxy and VPN Together?
It’s possible to use a proxy and VPN together. However, it’s an unnecessary step if you already have one or the other, as it can potentially slow down your internet speed. If you’re looking for more security, we recommend trying a double VPN — which chains two or more VPN servers together and adds several more layers of encryption — though you’ll be just fine with using a single VPN.
Does a Proxy Hide Your IP Address?
The main purpose of a proxy server is to hide your IP address. When you’re scrolling on the internet, your activity is routed through your proxy server, which hides your IP address. A proxy server also adds a layer of security against hackers.
Do You Need a Proxy If You Have a VPN?
You don’t need a proxy server if you already use a VPN service. Both can be used to hide your IP address. However, your VPN will encrypt your data, which a proxy server can’t do. If you have a VPN, adding a proxy server is not necessary.
Are Proxy Servers Safe?
Proxy servers are safe and useful for hiding your IP address and protecting against hackers. However, your data could potentially be sold to third-party advertisers if you use a proxy server.
By encrypting and routing all your network traffic, VPNs have a distinct advantage over a proxy server. Not only does the Panda Dome VPN service anonymize your internet traffic and circumvent geographic filters, but traffic is also carefully inspected and filtered. Our VPN servers check every request and block anything known to be dangerous, like websites that host malware.
Routing your web traffic through an advanced VPN helps you avoid malware infections, phishing scams and fake websites. And because Panda’s servers are constantly updated, you are protected around the clock from sophisticated cyberattacks.
Get started with the Panda VPN now — for more help and advice about staying safe online, take a look at the practical tips in the Panda Security blog.