Is your phone not charging? Worried it might be broken or needs a battery replacement? The solution may be simply cleaning your charging port.
Throughout the day, your phone accumulates debris, creating a barrier in the port and hindering a secure connection with your charger. Addressing this common issue ensures a smooth power flow, thereby restoring your device’s charging functionality.
According to a recent survey by Reviews.org, 40% of people experience ”low-battery anxiety” when their charge drops below 20%. Don’t let it happen to you — take a moment to clean your charging port and enjoy uninterrupted phone power.
Just be sure to note which type of port your device uses. Modern phones typically use USB-C, some older Android phones use micro-USB, and many Apple devices use Lightning (although Apple is also moving more models toward USB-C). Each port has a different pin layout, so be extra gentle, especially with USB-C’s dense contacts.
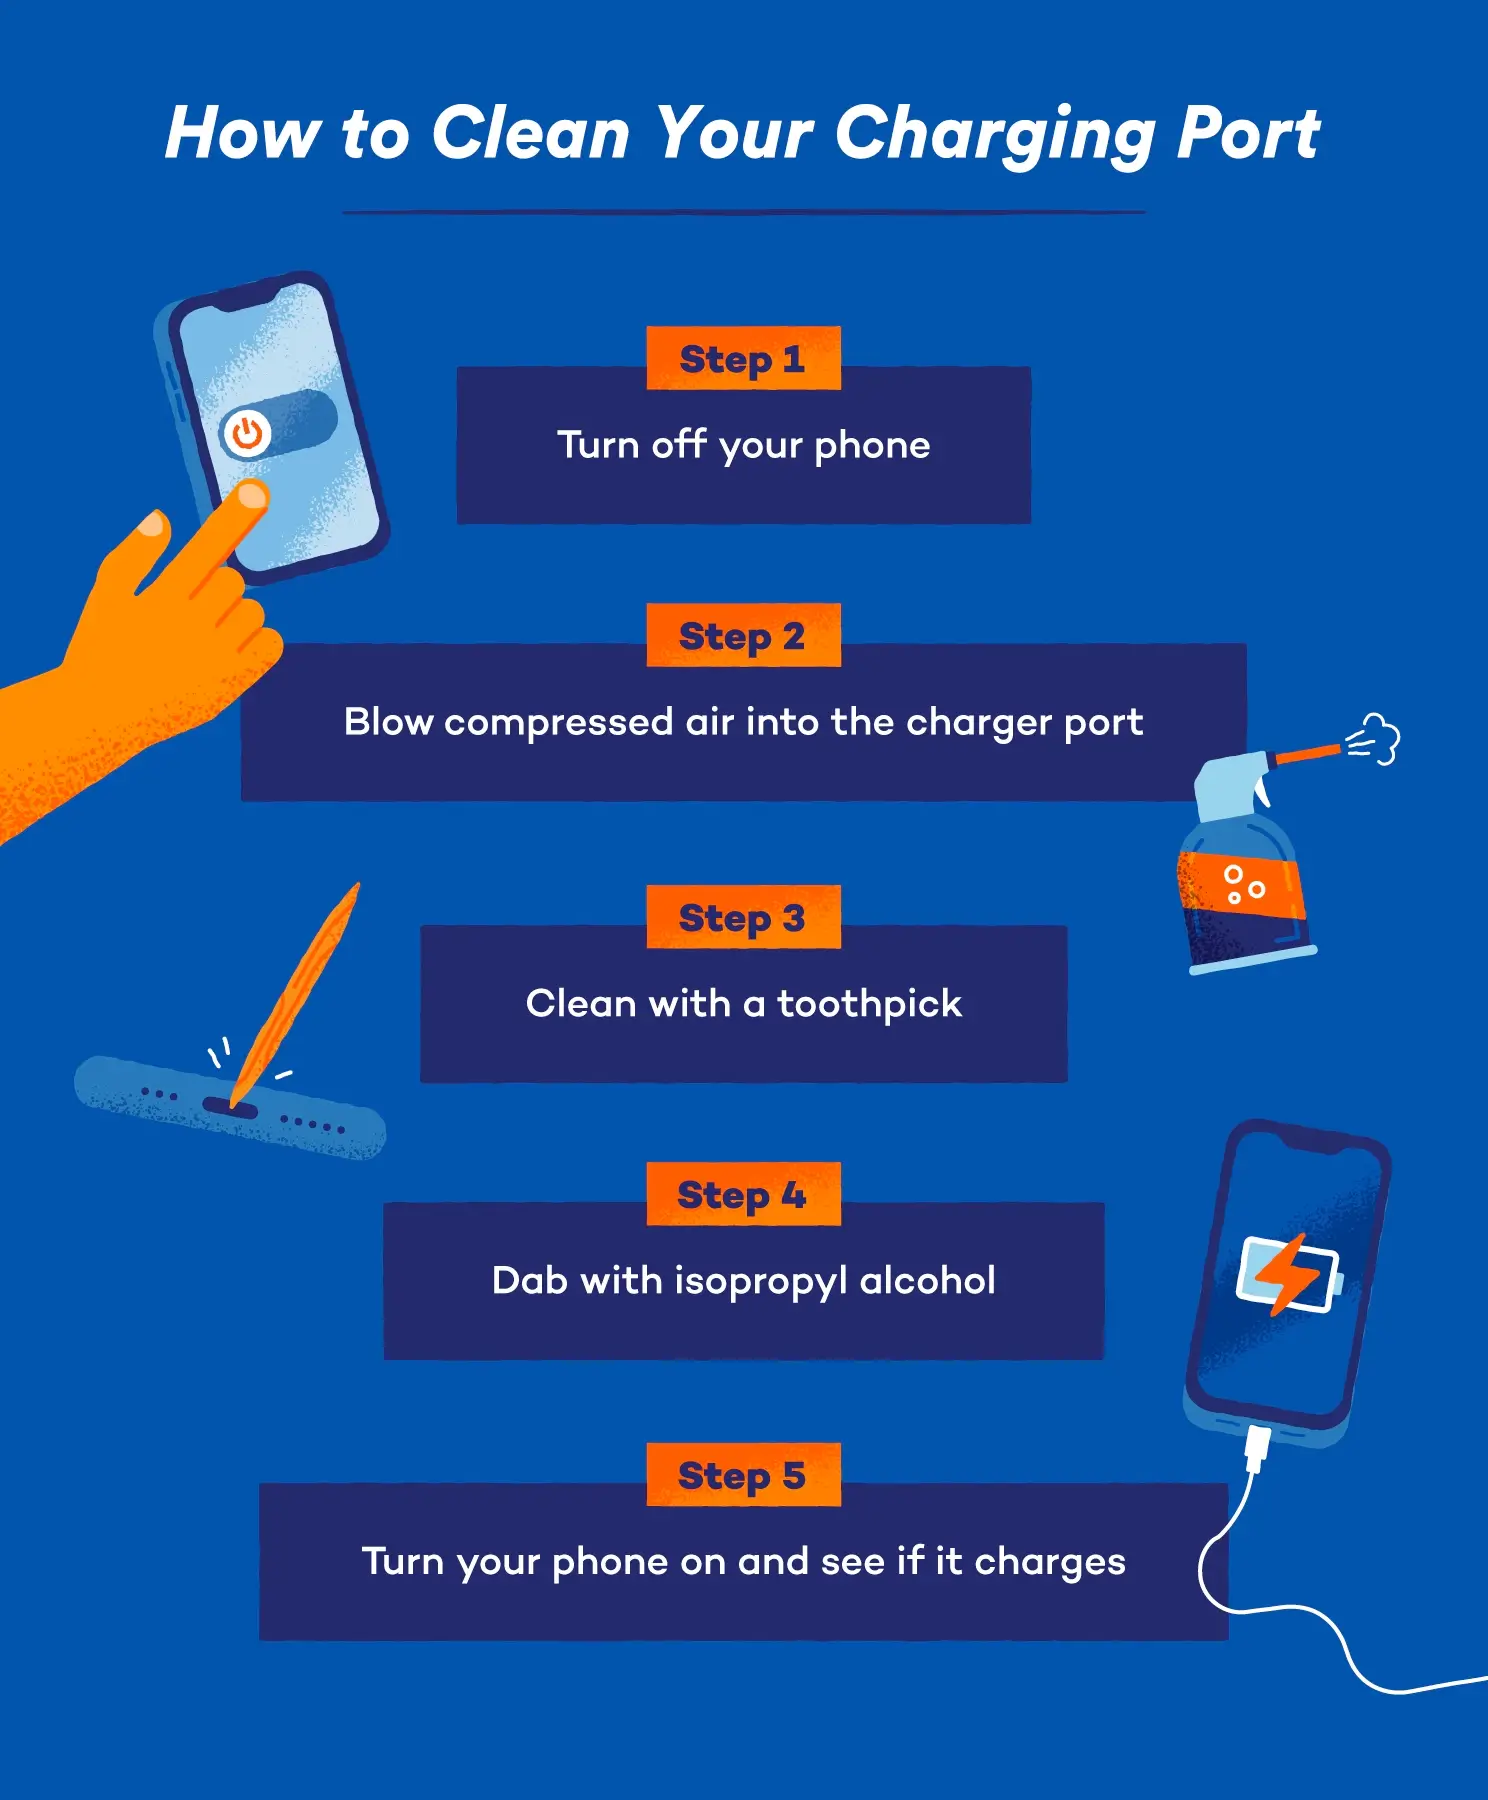
Step 1: Turn off Your Phone
Power off your phone. This step is crucial to ensure your safety during the cleaning process and to prevent any potential electrical mishaps.
Step 2: Blow Compressed Air
Use short bursts of compressed air from a can, held upright and several inches from the port, to dislodge loose particles and dust. Do not shake the can and never spray for prolonged periods. This helps create a clear pathway for your charger, optimizing its connection with the port. Avoid blowing into the port with your mouth, which can introduce moisture.
Step 3: Clean With a Toothpick
Carefully use a wrapped wooden or plastic toothpick or a dedicated plastic/electronics pick. If you wrap the tip, use a lint-free material (not loose cotton) or adhesive tape (sticky side out) to lift debris. The wrapping helps prevent damage to the port’s internal components. Avoid pushing, and never use metal tools.
Step 4: Use Isopropyl Alcohol
If you discover stuck-on grime, very lightly dampen (do not soak) a 90%+ isopropyl alcohol foam swab and gently touch only the outer walls of the port. Avoid rubbing the internal pins directly. Immediately follow with short bursts of compressed air to evaporate any residual liquid. Liquids are very risky, so try dry methods first..
Step 5: Turn on Your Phone
After completing the cleaning process, turn your phone back on and check if it starts charging again. If the problem persists after gentle cleaning, stop attempting invasive fixes and consult a certified repair technician — repeated forceful cleaning can bend contacts or cause corrosion.
Why Is My Charger Port Not Working?
One of the most common causes of charging problems may be surprising: dust. Lint and other dirt collect in the charging port, obstructing the battery connectors. When you insert your charging cable, the dust prevents a good electrical connection from being made, so no power is directed into the battery.
Left unattended, debris can reduce conductivity, bend internal pins or trap moisture that accelerates corrosion. Each of those risks can permanently affect your phone’s charging performance.
Finding out if you have a dust problem is quite easy — simply shine a light into the port where the cable connects and take a look. If you can’t see the metal charging contacts, or lint and dust are visible, you need to clean the port.
Tools to Use When Cleaning Your Charging Port
Here are some recommended tools to use when cleaning your charging port:
- Compressed air: Use a can of compressed air to blow away loose particles and dust from the charging port without causing any damage.
- Toothpick: Carefully use a wooden or plastic toothpick to dislodge debris in the charging port. Wrap one end of the toothpick with cotton to avoid scratching or damaging the interior components. A non-metal electronics pick would work, too.
- Microfiber cloth: Wipe the exterior of the charging port with a microfiber cloth to ensure it’s free from any dust particles and to maintain cleanliness.
- Foam or lint-free swab: Use for very light, local application of 90%+ isopropyl alcohol if necessary. Avoid touching the internal pins directly.
Tools to Avoid When Cleaning Your Charging Port
Be mindful of potential risks by steering clear of certain tools when cleaning your charging port. Here are tools to avoid for a safer cleaning process:
- Metal objects: Pins, paper clips and needles may fit in the hole, but because they are metal, you risk making an electrical short circuit that could destroy the phone.
- Toothbrush: A toothbrush with stiff bristles can be too abrasive and may cause damage. Opt for a small, soft brush specifically designed for cleaning electronics.
- Excessive moisture: Avoid using household tools that are excessively wet or liquids that can seep into the device and damage internal components. If you use isopropyl alcohol, apply it sparingly with a foam swab or a small brush to avoid overexposure to liquid.
- Cotton swabs: Avoid cotton-wrapped tips, as they can leave fibers behind.
- Breath: Blowing into the charging port using your breath might introduce moisture and saliva, which can corrode contacts and introduce contaminants. If possible, it’s advisable to use more controlled methods like a can of compressed air.
How to Remove Water From a Charging Port
Learn how to get liquid out of a water-damaged phone to ensure your device stays dry and functional.
- Power off your device: Immediately turn off your device to prevent potential short circuits.
- Shake and pat dry: Gently shake your device to remove excess water water in the phone charging port, and use a dry cloth or paper towel to pat the charging port dry.
- Use compressed air: Blow compressed air into the charging port to dry out any remaining water droplets. Hold the device with the port facing downward to allow gravity to assist in water removal.
- Let it air-dry: Leave your device in a dry, well-ventilated area for at least a few hours to ensure complete drying before attempting to charge again. Avoid heat sources like hair dryers, as excessive heat may damage the device.
How to Get Sand Out of a Charging Port
Gently blow compressed air into the charging port to dislodge sand particles. Make sure to hold the device with the port facing downward to ensure the sand falls out uninterrupted. After using the air compressor, inspect the port and attempt charging. If issues persist, consider professional assistance or consult your device’s manufacturer.
How to Clean a Charging Port Without Compressed Air
It’s still possible to clean a charging port without compressed air. Simply power off your phone, then use a soft, electronics-safe to gently sweep out dust or debris. For stubborn particles, carefully use a toothpick or SIM ejector tool wrapped in tape (sticky side out) to lift debris — just don’t force anything. Avoid using metal tools, water or blowing with your mouth to prevent damage or moisture buildup. If the port still isn’t clean, a repair shop can safely handle it.
What Do I Do If My Charger Broke Off in My Phone?
Here is how to fix a charger port:
First, power off your phone to avoid short circuits. Then, try to gently remove the broken piece using plastic tweezers or a toothpick with a bit of sticky tape on the end. Don’t use metal tools — they can damage the port or internal components. If it’s lodged in tightly or you can’t grab it safely, don’t force it. Take the phone to a repair shop, as attempting pry it out could cause permanent damage.
Tips to Keep Your Charging Port Clean
Explore these helpful tips to ensure your charging port stays clean, allowing for a seamless and uninterrupted charging experience for your device.
- To keep your charging port clean, use a silicon or rubber dust plug when your device is not charging and store it in a clean and dry environment.
- Keep your hands clean to minimize debris transfer.
- Regularly inspect the port for visible dirt particles and clean it with a toothpick or compressed air if needed.
- Make sure to handle charging cables with care during connection and disconnection.
- Avoid exposing your device to liquids to prevent potential corrosion in the charging port.
- Consider cases with port covers, or store the device with the port facing downward to reduce debris entry.
Consult a certified repair service to avoid permanent damage if:
- Gentle cleaning doesn’t restore reliable charging.
- You see bent pins, corrosion or a lodged object you can’t safely remove.
If you were wondering how to clean your iPhone charging port, we hope these steps help you achieve a smooth and hassle-free cleaning experience. Cleaning a Lightning port is quite easy — and it may solve your charging problems. Be careful, take your time and you could save yourself a serious headache next time your phone won’t charge.