If you’re experiencing unwanted pop-up ads or intrusive push notifications labeled Ads by DNS Unlocker while browsing the web, it usually means an adware program was installed on your computer. This program was created by cybercriminals who use deceptive methods to infect people’s computers without consent. This type of adware can gain access to your personal information and online activity, making it a threat to your data security. Aside from being a major nuisance, the ads displayed by DNS Unlocker can cause unwanted computer infections if you click on them.
Luckily, there are a handful of ways you can troubleshoot this issue and remove DNS Unlocker from your computer. Read on to learn more about how DNS Unlocker works and how you can remove it yourself at home.
What is DNS Unlocker?
DNS Unlocker is an adware program that takes over your internet browser with unwanted ads. Its main purpose is for cybercriminals to gain profit through advertising revenue as a result of victims clicking on the ads. The ads usually promote questionable third-party software and products such as web browser toolbars and optimization utilities. The ads will always contain some variant of the DNS Unlocker label, including:
- Powered by DNS Unlocker
- Brought to you by DNS Unlocker
- RocketTab powered by DNS Unlocker
- Ads by DNS Unlocker
- Ads powered by DNS Unlocker
In addition to displaying unwanted ads, DNS Unlocker also collects personal data such as your IP address, location and specific mouse and keyboard inputs. It also collects data about your internet browsing activity, such as the sites you visit, what pages you view, your search queries, your computer’s cache, saved passwords and more.
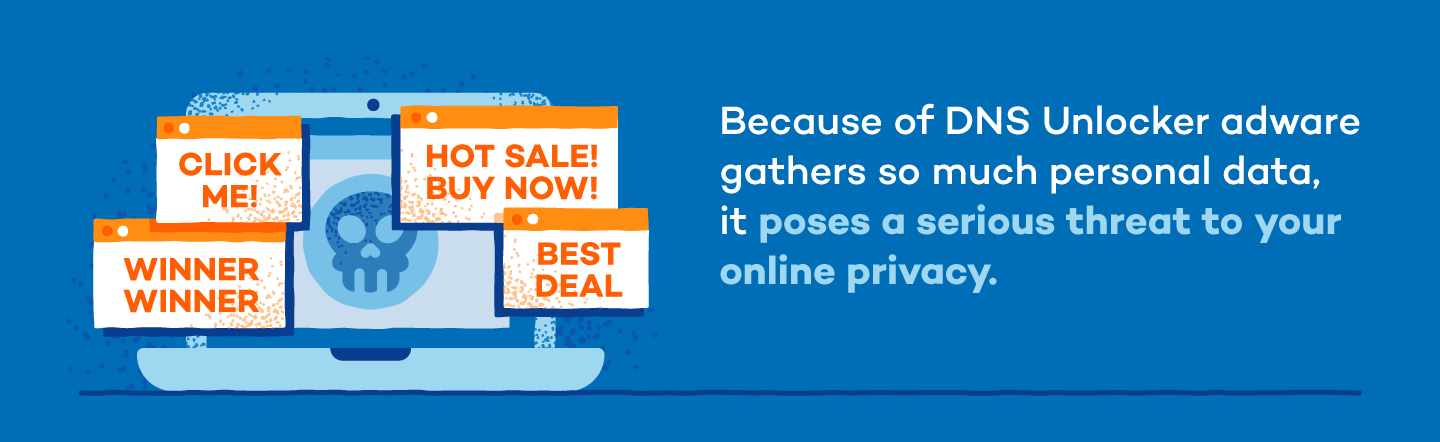
Because of all the personal data gathered by DNS Unlocker adware, it poses a serious threat to your online privacy and should be removed as soon as possible.
How Was DNS Unlocker Installed on My Computer?
The developers of DNS Unlocker adware use deceptive methods to plant the program on unsuspecting users’ computers. They often use a method called “bundling” where the program is combined with other free programs that you intentionally download. Usually, these free programs don’t disclose the fact that other software programs will be installed on your computer. Unfortunately, most of us don’t read the fine print when downloading software from around the web, and cybercriminals use this to their advantage.
How to Uninstall DNS Unlocker: 5 Methods
While the steps for removing DNS Unlocker adware from your computer might look overwhelming, they’re actually fairly simple to follow. There are a few different methods you can use to ensure the adware gets removed. It’s smart to work through all of them to be as thorough as possible and ensure all traces of the adware are removed.
1. Uninstall DNS Unlocker Using Control Panel
The first step in removing DNS Unlocker adware is locating it and removing it from your computer. Here’s how to do it:
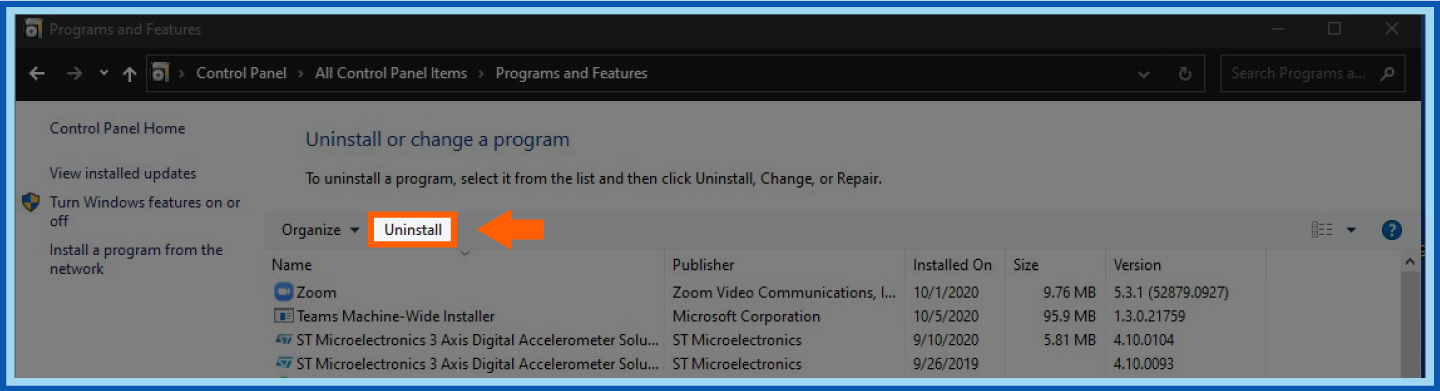
- In the Start menu, select Control Panel.
- Choose Programs and Features, then select Uninstall or change a program.
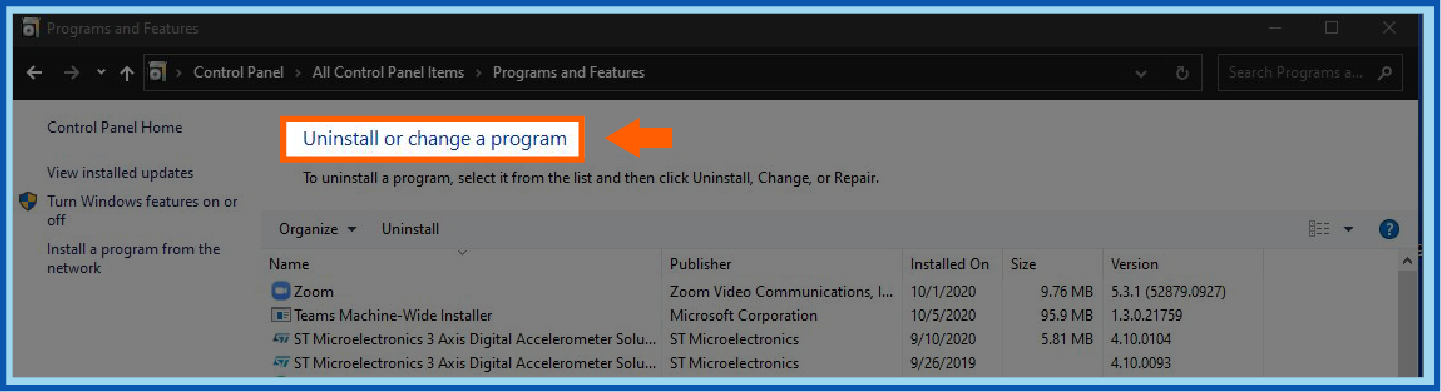
- In the Programs and Features screen that appears, you’ll see a list of your installed programs.
- Sroll through your programs and search for anything listed as DNS Unlocker.
- Select the program(s) and click the Uninstall button at the top.
The malicious program may not be listed under DNS Unlocker, in which case you can try to locate it by viewing your most recently installed programs. To do this, click the Installed On column to sort your programs by installation date and view your most recently installed programs.
Once you’ve completed the steps above, or if you’re unable to find any DNS Unlocker programs, you can move on to the next section.
2. Remove Adware With AdwCleaner
The next step is to further scour your computer for any malicious programs using a program called AdwCleaner. AdwCleaner is a free utility that locates and removes adware programs that may have been installed on your computer without your knowledge, like the DNS Unlocker adware.
To get started, run a Google search for “AdwCleaner” to find their website and download the program. Once it is finished downloading, double-click the AdwCleaner icon that appears on your desktop. Follow the steps below to run a system scan on your computer:
- After double-clicking the AdwCleaner icon from your desktop, you’ll see the program’s license agreement. After reading, select I agree to continue.
- If Windows asks whether or not you wish to run AdwCleaner, select Yes.
- In the AdwCleaner start screen that appears, select Scan. This will initiate the system scan to locate the DNS Unlocker adware and any other malicious files.
- Once complete, you’ll see a list of any malicious items found. Read through the list to ensure it doesn’t contain any programs you want to keep. If it does, uncheck the box to the left of the item entry. (Unless you see a program listed that you know shouldn’t be removed, continue to the next step.)
- Select Clean from the AdwCleaner screen.
- You will be prompted to save any open files or documents (any open programs must be closed for AdwCleaner to complete the cleaning process.) Do so now.
- Select OK from the AdwCleaner screen. AdwCleaner will now delete any detected adware on your computer.
- Once complete, you’ll be shown a screen explaining what PUPs (Potentially Unwanted Programs) and Adware are. Read the information, then select OK.
- You’ll see an alert that AdwCleaner needs to reboot your computer. Select OK.
After your computer reboots, AdwCleaner displays a log file containing the files and programs that were removed from your computer. You can review it, then close out the window and follow any additional on-screen instructions.
3. Restore Web Browser Settings
To completely remove DNS Unlocker adware from your computer, you’ll also need to reset your internet browser to its default settings. Note that this will remove any extensions or add-ons you’ve added to your browser, as well as any cookies and your browsing history, but your saved bookmarks and passwords will remain intact.
Below are the steps for three major internet browsers (Google Chrome, Internet Explorer and Safari)—just skip ahead to the section corresponding to the browser you use and follow the steps outlined below.
Google Chrome
- Open Google Chrome and click the Chrome menu button in the top right corner (it looks like three dots stacked vertically). Select Settings from the drop-down menu.
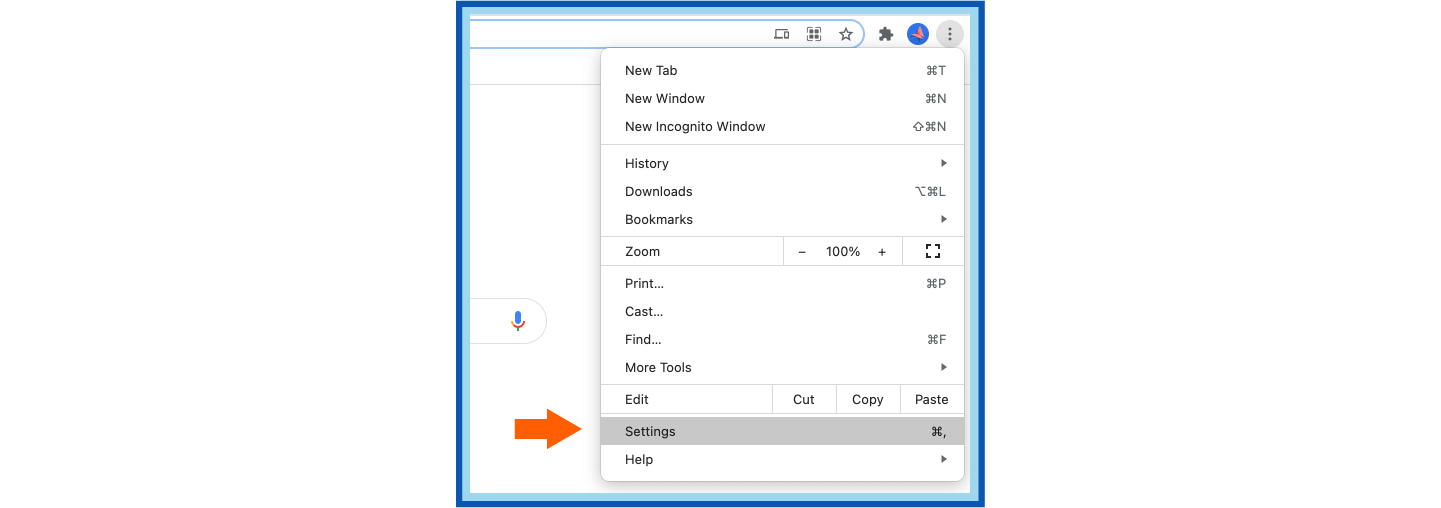
- Scroll to the bottom of the page and select the arrow next to Advanced to open advanced settings.
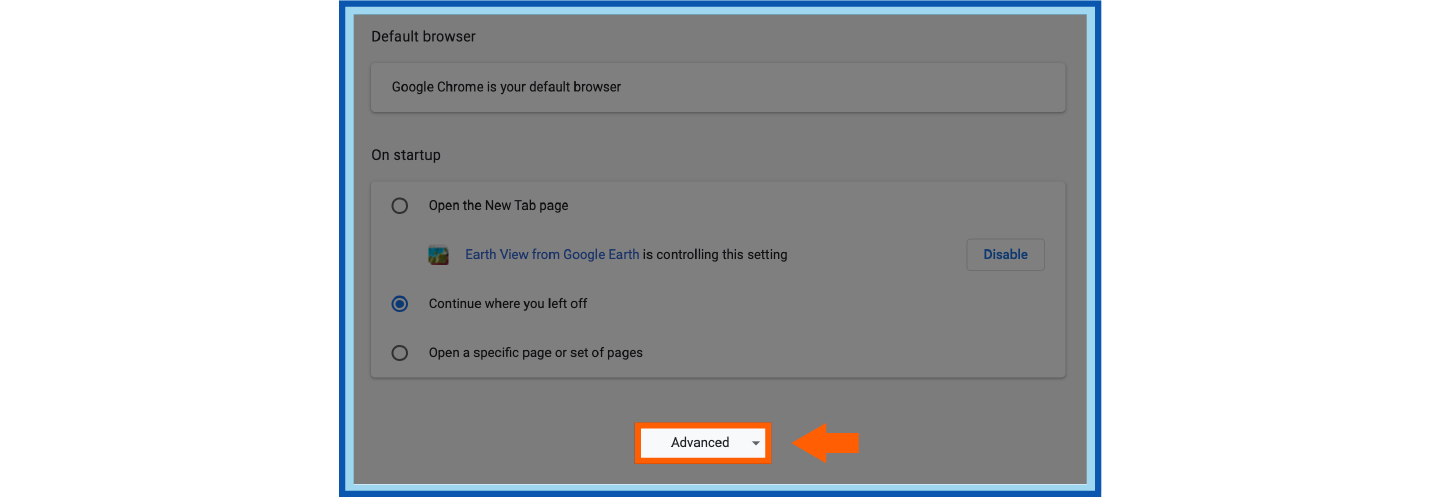
- Under the Reset Settings sections at the bottom of this page, select Restore settings to their original defaults.
 Select Reset Settings in the dialog box that appears.
 Chrome will now reset all your personal data and browsing history and disable any installed extensions.
Internet Explorer
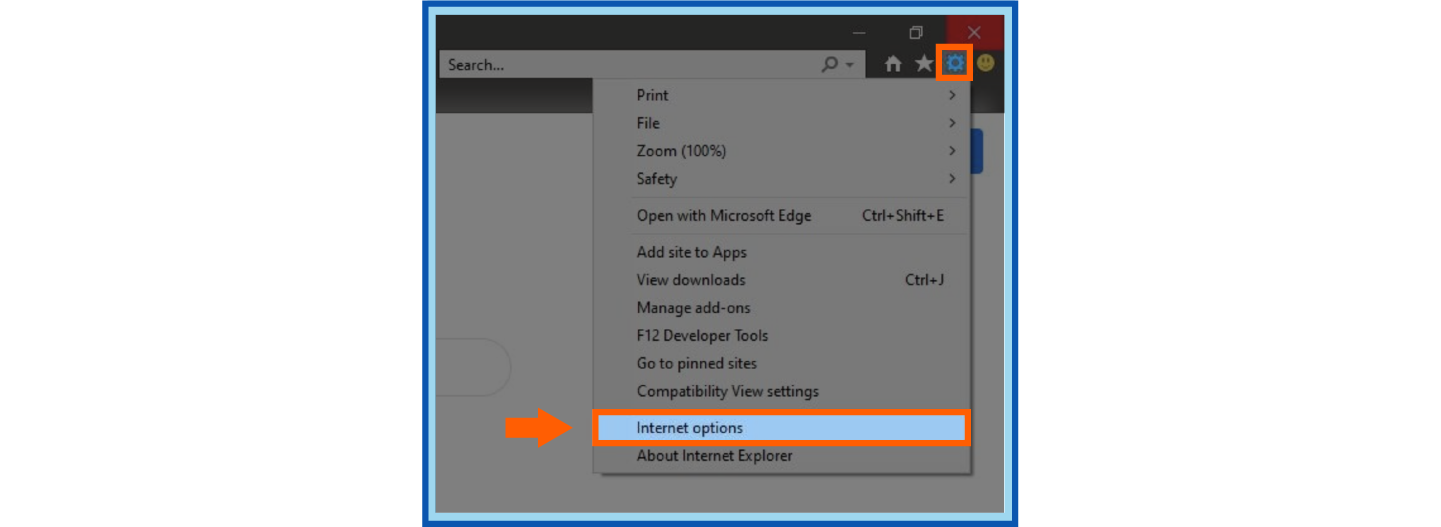
- Open Internet Explorer and click the menu button in the top right corner (it looks like a gear). Select Internet options from the drop-down menu.
- In the Internet Options box, click the Advanced tab in the top right corner.

- Click the Reset button found at the bottom.

- In the dialog box that appears, check the box next to Delete personal settings, then select Reset.

Your personal data and browsing history from Internet Explorer will now be reset. Once the reset process is complete, select Close from the dialog box that appears to finish.
Safari
- Open Safari. In the toolbar at the top of the screen, click Safari > Clear History.

- In the window that appears, select all history.

- Select Clear History to finish.

Your personal data and browsing history, along with any installed extensions, will now be cleared from Safari. You’ll see a blank page opened when the process is complete.
4. Restore DNS Servers
Once you’ve removed the DNS Unlocker program from your internet browsers, you’ll then need to restore the DNS settings found on your computer. Here’s how to do it:
- Open a Run window by pressing the Windows key + R simultaneously. Type “ncpa.cpl” and hit OK.

- A Network Connections screen will appear with a list of your network adapters. Find your active internet connection—which is typically labeled Ethernet, Local Area Network or Wireless—and right-click it, then select Properties.

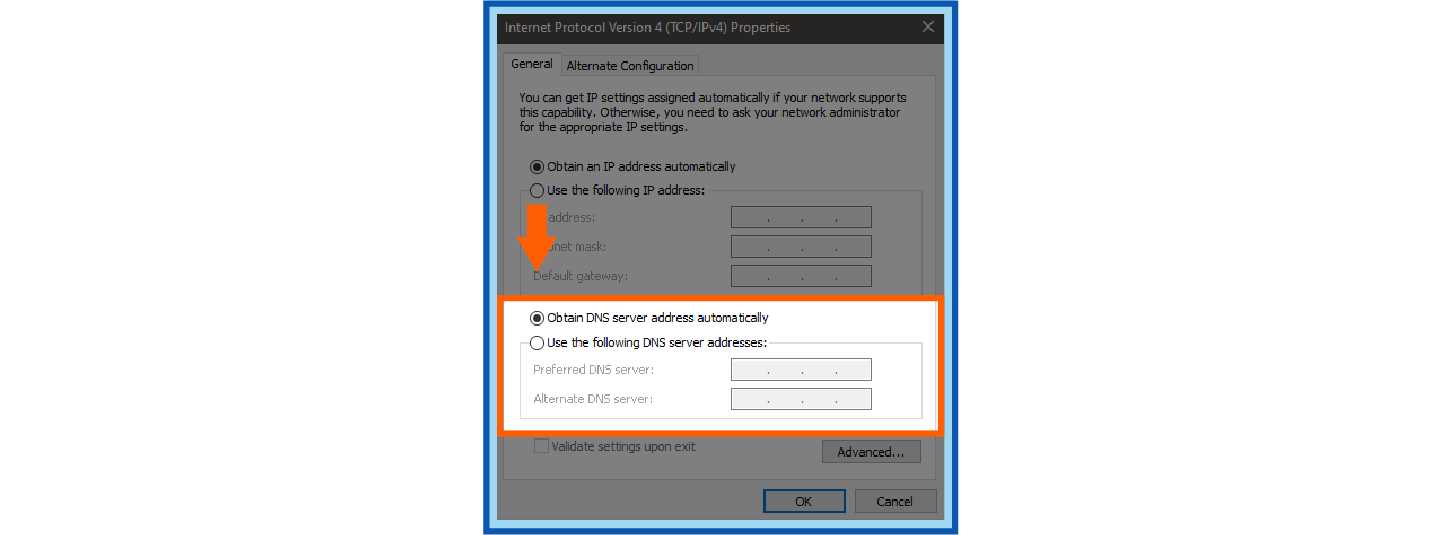
- In the Ethernet Properties box that appears, find the item labeled Internet Protocol Version 4 (TCP/IPv4) and double-click it.

- In the Properties box that appears, select Obtain DNS server address automatically. Hit OK.
Follow any additional on-screen instructions, then close the dialog box. Your DNS servers will now be restored.
5. Remove Remaining Adware With HitmanPro
HitmanPro is a free adware and malware remover that provides an extra layer of defense against cybersecurity threats. It’s meant to be used in tandem with your main antivirus software and can find and remove any traces of adware that AdwCleaner or your preferred antivirus software might have missed.
To get started, download HitmanPro here. Once it is finished downloading, open the program. If you see a pop-up box asking if you want to allow HitmanPro to make changes to your device, select Yes. Then follow these steps to start the scanning process:
- On the screen that appears, hit Next to continue. HitmanPro will now scan your computer for any adware and unwanted programs.
- Once complete, you’ll see a list of any malicious items found. Hit Next to continue and remove the detected items.
- A Product Activation screen will appear. Select Activate free license to start a 30-day free trial, which is required to complete the scan.
- When the scan is complete, you might see a Removal Results screen displaying details of the removed programs. If applicable, hit Next. If prompted, click the Reboot button.
Your computer should now be clear of any additional malware or adware programs that your main antivirus software didn’t catch. If you started a 30-day trial of HitmanPro, you can repeat the process weekly to keep your computer free of adware.
Discovering unwanted adware on your computer that was placed without your permission can be frustrating and concerning. Luckily, working through the steps above should allow you to successfully remove any DNS Unlocker programs from your computer.
Unfortunately, deceptive cybercriminals are always becoming more cunning and creative in their ability to infiltrate unsuspecting users’ computers with harmful software—and put people’s personal data and security at risk in the process. That’s why using a trusted antivirus software across all your devices is crucial to protect your personal information, data and security. To learn more about protecting your data online, be sure to check out how Panda Security helps keep your devices and information safe with great tools like free Antivirus software.