The internet puts the world at your fingertips. From laughing at your favorite shows to shuddering at the news, anything you want to access is just a click away. But that may be worrisome if you’re a parent or teacher. Children often have access to multiple devices and platforms, like social media, online gaming and mobile apps, increasing their chances of exposure to mature content.
Setting up internet parental controls is a great way to reduce the risk of your child viewing inappropriate content on the web.
Parental controls are available on most major internet-enabled devices. This guide shows you how to set them up on browsers, laptops, smartphones, streaming sites, gaming systems and more to manage your kids’ content properly.
What Can Parental Controls Do?
Parental controls are software or device-specific options that allow parents to monitor their child’s internet use. They prevent children from accessing inappropriate, unsuitable, or illegal content online. They can be implemented within your internet service provider, search engines, video streaming sites, chat software and more.
- Control or block the video games your child can access
- Filter web browsers and only show pre-approved websites
- Prevent children from using certain services
- Manage search engines to limit what a child can search online
- Manage types of videos that are searchable
Check out Panda Dome Family parental control
Learn more about what internet parental controls can do from these commonly asked questions:
- What are the best parental controls if I want to block video games?
- What are the best parental controls if I want to filter content and limit web browsing?
- What are the best parental controls if I want to set time limits for internet access?
- What are the best parental controls for blocking websites?
- What are the best parental controls for limiting what a child can search online?
- What are the best parental controls for managing and blocking video content on YouTube?
How to Set Internet Parental Controls
Parental controls can prevent and filter a variety of inappropriate content for little ones. However, figuring out how to set parental controls on each device can be confusing. We explain how to set them on the following devices and services:
- Routers
- Computer Operating Systems
- Internet Browsers
- Video Streaming
- Gaming Systems
- Mobile Phones
- Parental Control Apps
How to Set Parental Controls on Your Router
Parental controls on Wi-Fi routers allow you to manage and control your kids’ internet use by setting time limits on browsing, monitoring online activity, disabling internet access, restricting website access and even customizing user profiles for each family member.
Website filtering is available on most home routers via your internet service provider. Log in to your admin account, look for a tab labeled “parental controls, website filtering, or access restrictions,” add the specific URL to the block list and save. Once you reset your router to activate the changes, you can control website filtering from your account page on any laptop or mobile device.
A few popular routers that offer internet parental controls include:
- Netgear Nighthawk
- Linksys Smart Wi-Fi
- Google Nest Wifi
- TP-Link Archer A7
We will walk you through how to set up browsing time limit parental controls for the TP-Link Archer A7. Note that these instructions can apply to many router types with access to the router’s online dashboard:
- Visit tplinkwifi.net and log in to your admin dashboard.
- Click Enable Parental Controls under the Parental Controls Tab.
- Under Basic Info, create your profile and click Add Devices.
- Under Filter Content, select your preferences; for example, the Blacklist option will block all websites that contain a specific keyword, or Whitelist will approve websites with specific keywords.
- Under the Time Controls tab, select the times you want the user to access the internet.
- Enable your time settings and hit Save.
How to Set Parental Controls on Computer Operating Systems
Most computer operating systems like Apple, Windows and Chromebook contain parental control settings to ensure your child is safe from the minute they turn on their device.
Windows 10
Content restrictions include:
- Blocking inappropriate apps, games and media
- Requiring children to ask a parent before purchasing in the Microsoft Store
- Blocking inappropriate websites
Block inappropriate apps, games and media:
- Head to this page and sign in with your Microsoft account.
- Set up a child account through Windows Settings. If you already have one, find your child’s name and choose Content Restrictions.
- Go to Apps, games & media and toggle Block inappropriate apps, games and media to On.
- Under Allow apps and games rated for, choose the age limit you’d like to apply for your child.
- When your child requests to access a blocked application or game, you can approve it by going to Content restrictions and adding it to the Always allowed list.
- In the case that your child downloaded something prior to these limitations, you can block it by going to the Activity page. Your child will need permission to use it again and you can approve or disapprove via email.
Block Inappropriate websites:
- Sign in to your Microsoft account using this page.
- Find your child’s name and click Content restrictions.
- Scroll to Web browsing and toggle Block inappropriate websites from off to On.
- For blocking specific sites, add their URLs under Always blocked.
- To limit your child to only browse specific websites, check the box next to Only allow these websites.
Require kids to ask a parent before purchasing in the Microsoft Store:
- Find your child’s name and then choose Content restrictions.
- Toggle Needs adult approval to buy things On.
- Approve or deny their requests through your personal email or on account.microsoft.com/family.
Learn more at Microsoft Support
Apple
Mac OS Parental Controls Internet content filter
Enable Internet content filtering:
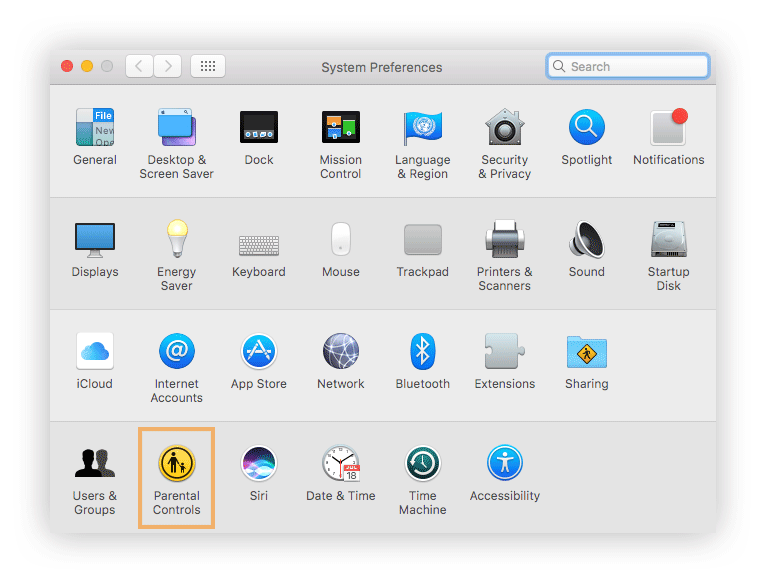
- From the Apple menu, select System Preferences.
- Select Parental Controls.
- Choose the user account on the left side of the window that you want to enable filtering for (your child’s account).
Note: Parental Controls cannot be enabled for administrator accounts. Make sure your child’s account has managed access and is not an admin.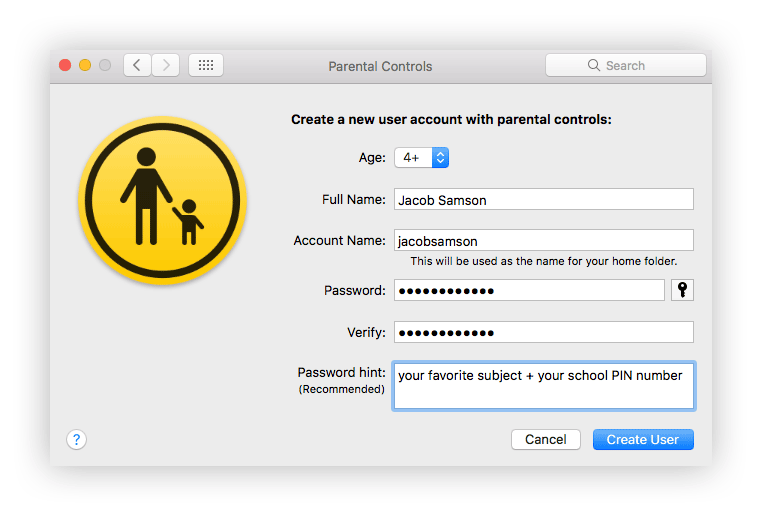
- Select Enable Parental Controls.
- Click the Content tab.
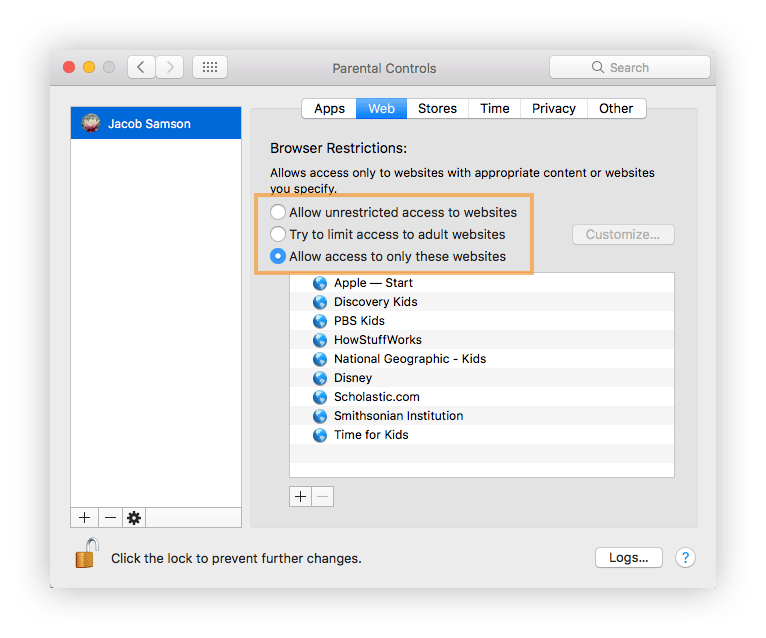
- Choose one of the three modes under Website Restrictions (unrestricted, automatic, whitelist).
Apple’s Internet content filter has three modes:
2. “Try to limit access to adult websites automatically” (automatic): Filters websites with inappropriate content similar to the way mail applications identify “junk” mail. This filter can:
- Identify whether a webpage is safe or not by inspecting the website’s text and structure.
- Block websites if they identify as adult-oriented using RTA or Safe Surf rating systems.
- Log all visited and blocked websites, and flag blocked websites in the Logs tab of Parental Controls preferences.
3. “Allow access to only these websites” (whitelist): This will restrict any website that is not listed.
The internet content filter cannot examine the encrypted content of a page (https or SSL encryption). For this reason, encrypted websites must be allowed using the Always Allow list. If not, the encrypted websites will automatically be blocked.
Learn more at Apple Support
Chromebook
- Sign in to your Chromebook.
- Click on your account photo located in the lower right-hand corner of the screen.
- When the pop-out window appears, choose the gear-shaped icon for Settings.
- Scroll down to the section People and click Manage other users.
- The Users interface should be visible. Select a checkmark next to the Enable supervised users setting. Then select Done to return to the previous screen.
- Click on your account photo again and select Sign out. Select Click More at the bottom of the screen with three vertical dots.
- Then select Add supervised user. Click Create supervised user.
- You’ll be prompted to choose the managing account for your new supervised user profile. Choose the desired account from the list and its password. Select Next to continue.
- Enter a name and password for the supervised user. Add an image and click Next.
- You now have a supervised profile, and if successful, you’ll receive an email with more details.
Learn more at Chrome Support
Parental Control Chrome Extension
How to Set Parental Controls on Internet Browsers
Now that you have the device’s OS system controlled, it’s time to start on internet browser parental controls. Parental control browsers increases cybersecurity for kids by restricting inappropriate online content. Discover how to manage internet access, filter content and limit web browsing for popular browsers like Chrome, Firefox and Safari.
Safari
If you are using the Safari browser, follow the same procedure as Apple Mac OS to enable parental controls.
Google Chrome
- Log in to your Google account.
- Click on the main menu button in the top right-hand corner with three vertical dots.
- Once the drop-down menu appears, select Settings.
- Select the section called People.
- Select Add person and select an image and a name for the new user.
- While creating this person, put a check in the checkbox next to Control and view the websites this person visits from [active user’s email address].
- Next, click on Add and a new Chrome window will open.
- Once the profile for your child is created, you’ll want to select Supervised Users Dashboard and click on My Child.
- Here you can add parental control settings in the Permissions section and choose to “lock” SafeSearch.
Learn more at Google Support
You can also see which sites your child visits in the Activity setting and approve/disapprove their requests to access sites.
Firefox
Firefox automatically checks the parental controls on your device and sets itself to Prefer:Safe mode. This will auto turn on the safety feature on each website your child visits as long as there are active parental controls on your computer. The feature can only be turned off through password-protected parental settings on your operating system. That way your child will not be able to deactivate this feature through the Firefox browser. Here are Firefox add-ons for parental control:
- Go to the Firefox main menu and click Add-ons.
- Type Parental Controls into the search bar and click Install.
Block websites on Firefox:
- Go to the Firefox browser and click Settings from the hamburger menu.
- Click the Privacy and Security tab.
- Select the Strict option to block inappropriate sites.
Set up screen time content and privacy restrictions on Mac:
- Click the Apple menu icon in the upper left-hand corner.
- Select System Settings.
- Select the Screen Time app.
- Click the Content and Privacy section.
- Select Turn on.
From the Screen Time app, you can restrict websites, movies, shows and purchases under the Restrictions tab.
Learn more at Firefox Support
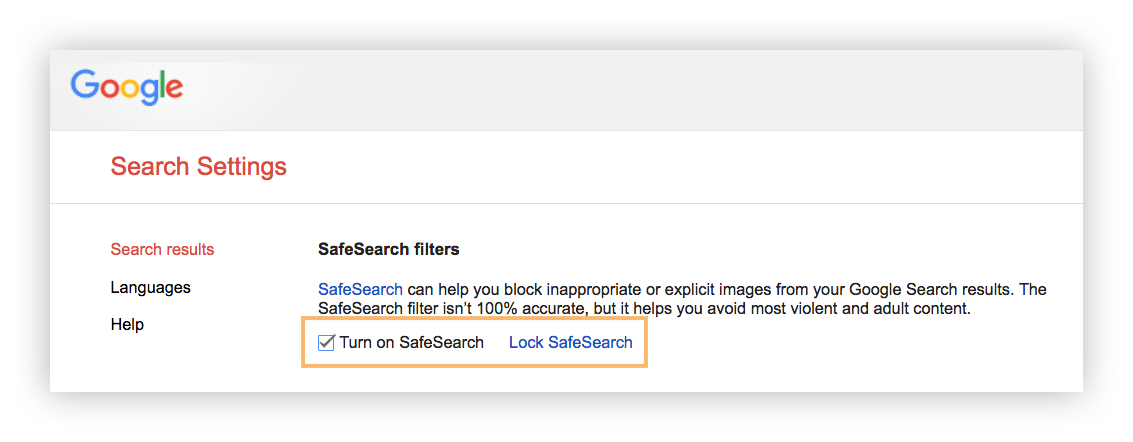
Google SafeSearch
- Go to the Google search engine.
- Go to Search Settings.
- Under SafeSearch filters, check the box next to Turn on SafeSearch.
At the bottom of the page click Save.
Learn more at Google Support
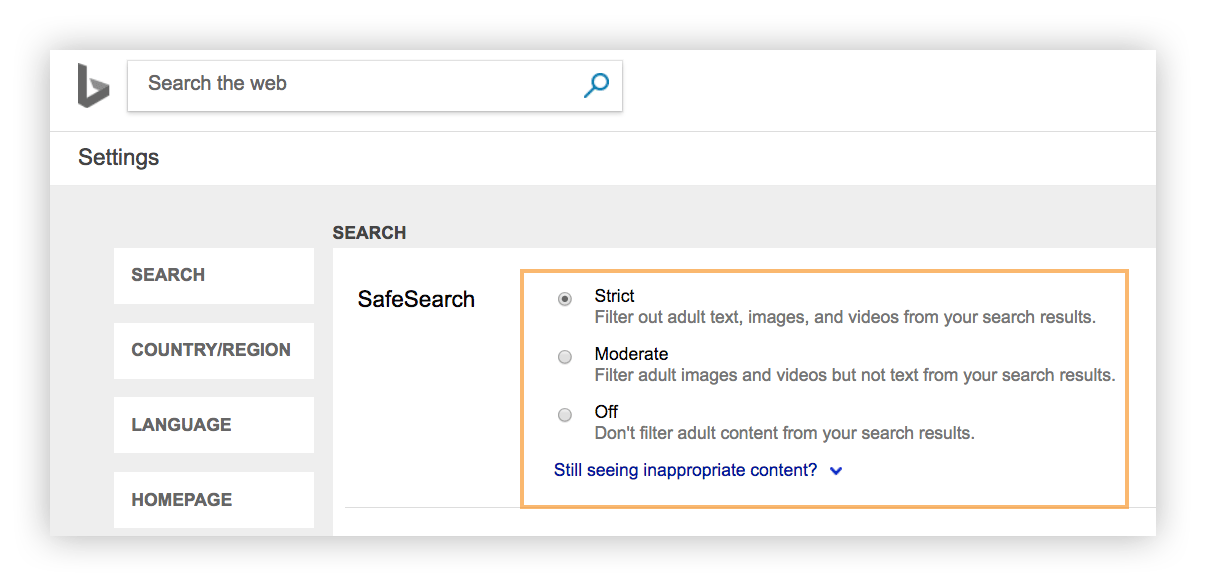
Bing
- Visit https://www.bing.com/account.
- Under Search and SafeSearch toggle on Strict.
- At the bottom of the page click Save.
Learn more at Bing Support
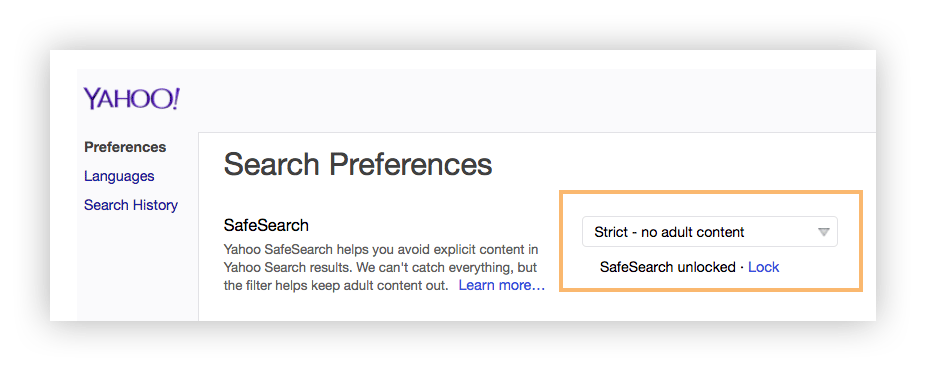
Yahoo
- Open the Yahoo search engine in a browser or open the Yahoo search app and sign in.
- Search for a term, then scroll down to Settings at the bottom left of the page.
- Click Settings.
- Select Preferences.
- Select your SafeSearch preference, then tap Done (if on iOS).
Learn more at Yahoo Help
How to Set Parental Controls for Video Streaming
Every day, millions of videos that may not be age-appropriate for your kids are published. These parental video-streaming controls protect your children from mature content. We have added parental controls for the most common video streaming sites: YouTube, Netflix and Hulu.
YouTube
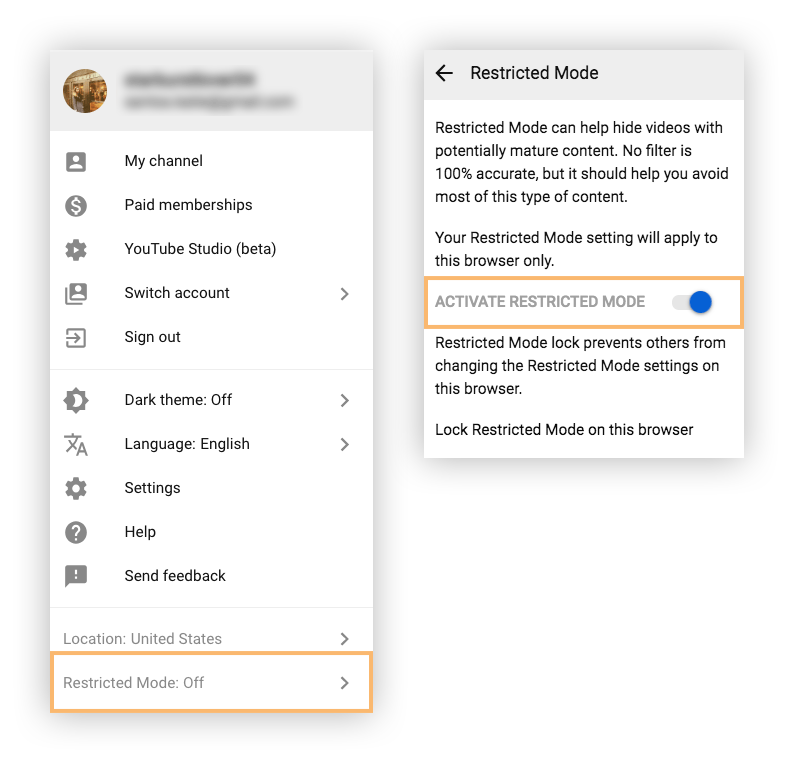
YouTube Kids is available on both iOS and Android platforms. It is parental control enabled and filtered just for kids. YouTube Kids focuses its content on music, education and other categories to keep kids safe online. We recommend downloading YouTube Kids onto your children’s devices and keeping YouTube passcode protected if it’s downloaded on your phone. Follow these steps to set up parental controls on the original YouTube app.
- Launch YouTube and sign in.
- Click on your profile picture on the top right of the screen and select Restricted Mode.
- It will then open a drop-down menu where you can toggle Restricted Mode on.
For iOS, click on your profile and under Settings toggle on the Restricted Mode button. For Android users, the option can be found under Settings – General.
Learn more at YouTube Help
Netflix
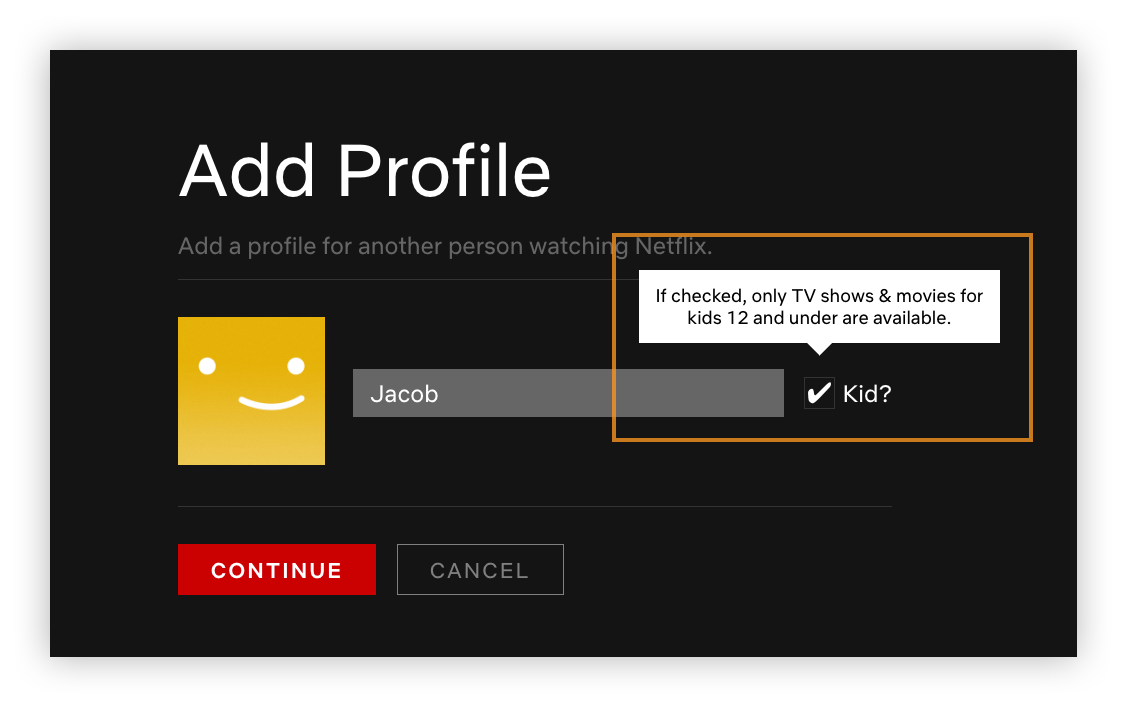
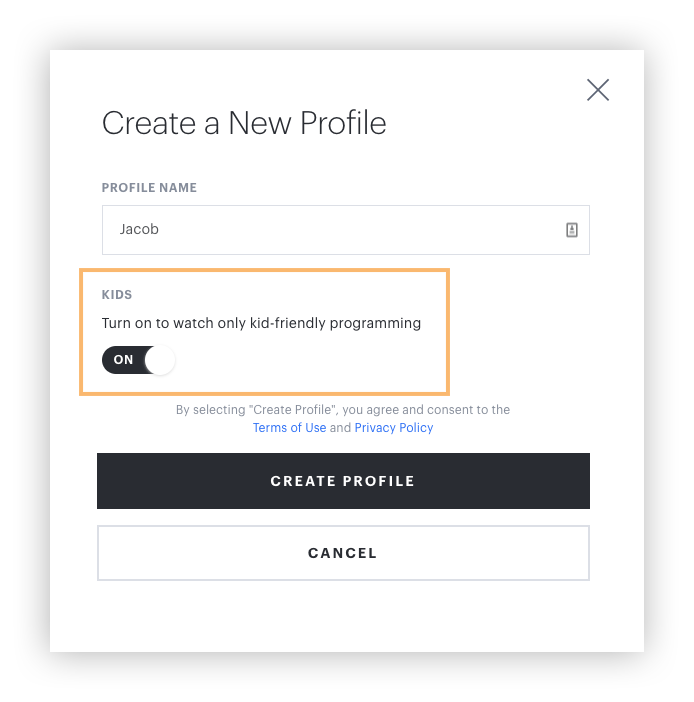
There are a variety of controls you can choose from on Netflix. They have hard and soft controls that you can set up along with maturity levels for each individual profile.
Here are the types of age-limiting parental controls:
- Little Kids: Only shows and movies suited for “all ages” will be available.
- Older Kids: Media rated all ages, 7+ and some 13+ will be available.
- Teens: Movies and shows suitable for teens (13+) will be shown.
- Adults: All listed media will be available.
Account-level hard controls:
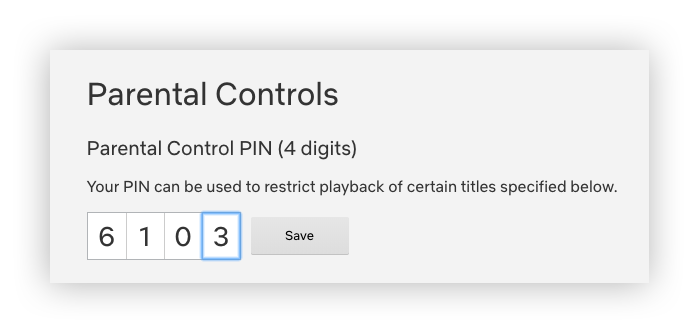
- Requiring a PIN for specific maturity ratings: Set a 4-digit PIN that is required to play any video content above a selected maturity level on any profile. The PIN ensures that your child doesn’t watch content rated above the selected maturity level.
- Requiring a PIN for specific video content: Set a 4-digit PIN that must be entered to play specific video content on any profile. This ensures your child does not watch the particular video content.
Setting up your PIN:
- Go to your Account page from a web browser.
- Choose the link for Parental controls in the Settings section.
- Enter your Netflix credentials and select Continue.
- Enter four numbers into the PIN field — this will be your PIN.
- Set your PIN protection level from the following choices:
- Little Kids: all ages
- Older Kids: 7+, some 13+
- Teens: 13+
- Adults: 16+, 18+
- Choose Save.
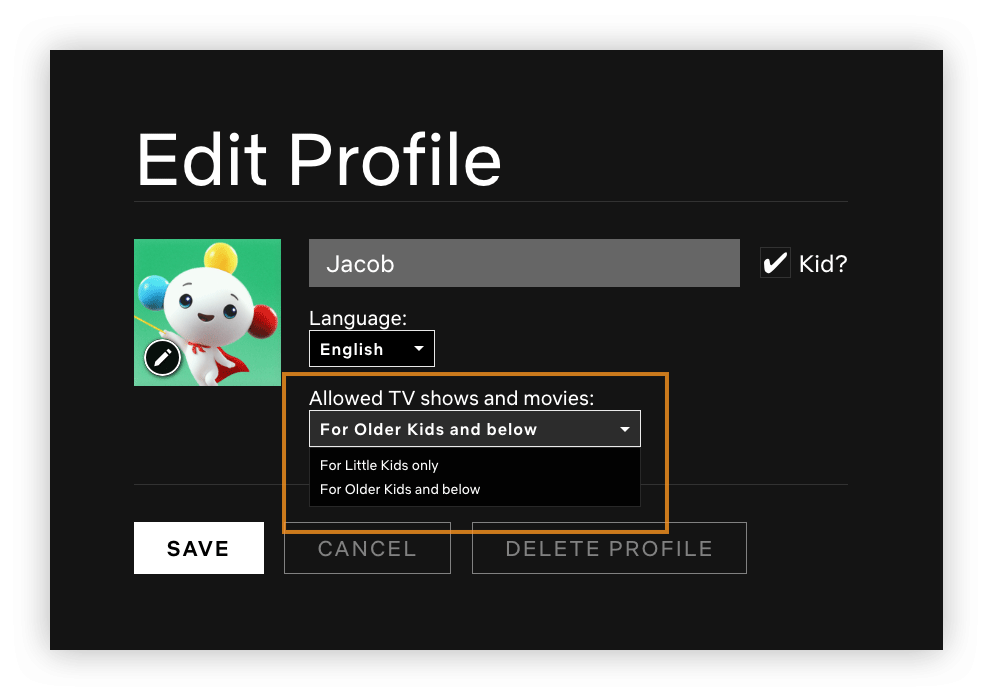
Account-level soft controls
- Choose a maturity level for a profile: Set a maturity level for a profile to control the video content available for that profile. The parent or guardian then ensures their child only uses their correct profile.
Set the maturity level for a profile:
- Go to your Account page and select Manage Profiles.
- Choose the profile you’d to edit.
- Under Allowed TV shows and movies, choose your desired maturity level.
- Little kids only – G, TV-Y, TV-G: video content suitable for all ages
- Older kids and below – PG, TV-Y7, TV-Y7-FV, TV-PG : video content suitable for older kids
- Teens and below – PG-13, TV-14: video content suitable for teens
- All Maturity levels – R, NC-17, TV-MA: watch all video content, including mature content
- Select Save.
Learn more at Netflix Help
Hulu
Hulu parental control is based on the age associated with your Hulu profile. User accounts who specify an age under 17 will not be allowed to watch mature content (films rated R or TV-MA shows) using their individual profile. Hulu will also respect your device’s parental controls on devices such as an Xbox One. For Hulu Plus subscribers, there is a Hulu Kids section you can set up for your little ones.
Learn more at Hulu Help
How to Set Parental Controls for Gaming Systems
In many households, gaming is a popular choice for children and teens. Sometimes it’s more popular than spending time online, so it’s important to use internet parental controls to block video games and restrict your child’s access. Follow these how-tos for the most popular gaming systems.
Xbox
Block inappropriate apps, games and media:
- Sign in with your adult account on your Xbox.
- Select the Xbox button on the controller to pull up the guide.
- Select System > Settings > Account > Family.
- Choose the account you want to update, select Access to content and then select the appropriate age limit you’d like.
- When your child requests to use a blocked app or game, you can approve and add it to the the Always allowed list under Content restrictions.
- If your child has downloaded something prior to setting these restrictions, you can block it on the Activity page. They will need your permissions to use it again. The permission request will be sent via email.
Block inappropriate websites:
- Sign in with your adult account on your Xbox.
- Press the Xbox button to open up the guide and then choose System > Settings > Account > Family.
- Select your child’s account that you wish to add the web filters to and then select Web filtering.
- Select the drop-down to view all of the options.
- Choose the desired level of web filtering.
Require kids to ask a parent/guardian before purchasing on Microsoft Store:
- Sign in with your adult Account on the console.
- Press the Xbox button to pull up the guide, then choose System > Settings > Account > Family and choose your child’s account.
- Select Privacy & online safety > Xbox Live privacy > View details & customize > Buy & download and select On from the drop-down.
Learn more at Xbox Support
PS5
PS5s are the only consoles with preset internet parental controls that restrict features like web browsing, online communication, user-generated content and more for specific age groups. You can also customize these preset restrictions based on their preferences.
Set up PS5 parental controls online:
- Select Account Management.
- Head to the Family Management section. Here you have the option to select the account you want to manage.
- Choose Family Member Account.
- Select Edit Features to customize settings.
Set up PS5 parental controls in console:
- Select Settings.
- Navigate to Parental Controls. Here you have the option to select the account you want to manage.
- Head to the Family Management section.
- Choose a Family Member Account.
- Select Edit Features to customize settings.
List of features parents can edit:
- Playtime settings
- Time zones
- Age ratings
- Restriction levels
- PlayStation VR use
- Web surfing
- Online communication
- User-generated content
- Age filtering
- Monthly spend
- Approved games
- Privacy setting
- Password reset
Set up monthly spending limit for web browsing:
- Select Account Management.
- Head to the Family Management section.
- Choose the Family Member Account you want to set a spending limit for.
- Select Edit Features to customize settings.
- Adjust the monthly spending limit to your desired amount.
Set up monthly spending limit for console:
- Go to Settings.
- Select the Family and Parental Controls tab.
- Head to the Family Management section.
- Choose the account you want to set spending limits for.
- Adjust the monthly spending limit to your desired amount.
Set up PS5 restriction passcode:
- Sign in to your account.
- Click Settings.
- Navigate to Family and Parental Controls.
- Select PS5 Console Restrictions.
- Enter restrictions passcode or default code, which is 0000.
- Select a 4-digit passcode.
- Press Confirm.
Set up PS5 restriction login passcode:
- Go to Settings.
- Navigate to Users and Accounts.
- Select Login Settings.
- Set PS5 passcode.
- Select a 4-digit passcode.
Learn more at PS5 Help
Nintendo Switch
To set up and manage parental controls on your child’s console, download the Nintendo Switch Parental Controls app on your smart device and register your console.
Set up Nintendo Switch Parental Controls on smart device:
- Download the Nintentdo Switch Parental Controls app.
- Go to Account Sign in.
- Select Edit Features to customize settings.
Set up Nintendo Switch Parental Controls on console:
- Open Settings.
- Select Parental Controls tab.
- Go to Account Sign in.
- Select Edit Features to customize settings.
List of features parents can edit:
- Daily playtime limit
- Age level restrictions
- Online communications
- Posting screenshots on social platforms
- Block games
- Software rating
Set up Nintendo Switch Restrictions:
- Sign in to your Nintendo Account.
- Navigate to the Family Group section.
- Choose a Family Member Account.
- Select Restriction sSetting.
- Check the box to turn on restrictions.
- Save your changes.
Set up Nintendo Switch PIN:
- Sign in to the Nintendo Switch app.
- Select Settings.
- Select PIN.
- Create a 4-digit PIN.
Learn more at Nintendo Switch Support
How to Set Parental Controls for Mobile Devices
Whether your child has their own Android or Apple device or they use yours, it’s important to set up cell phone parental controls. You can turn off functions such as in-app purchasing, restricting web search and more.
iPhone
Set content & privacy restrictions:
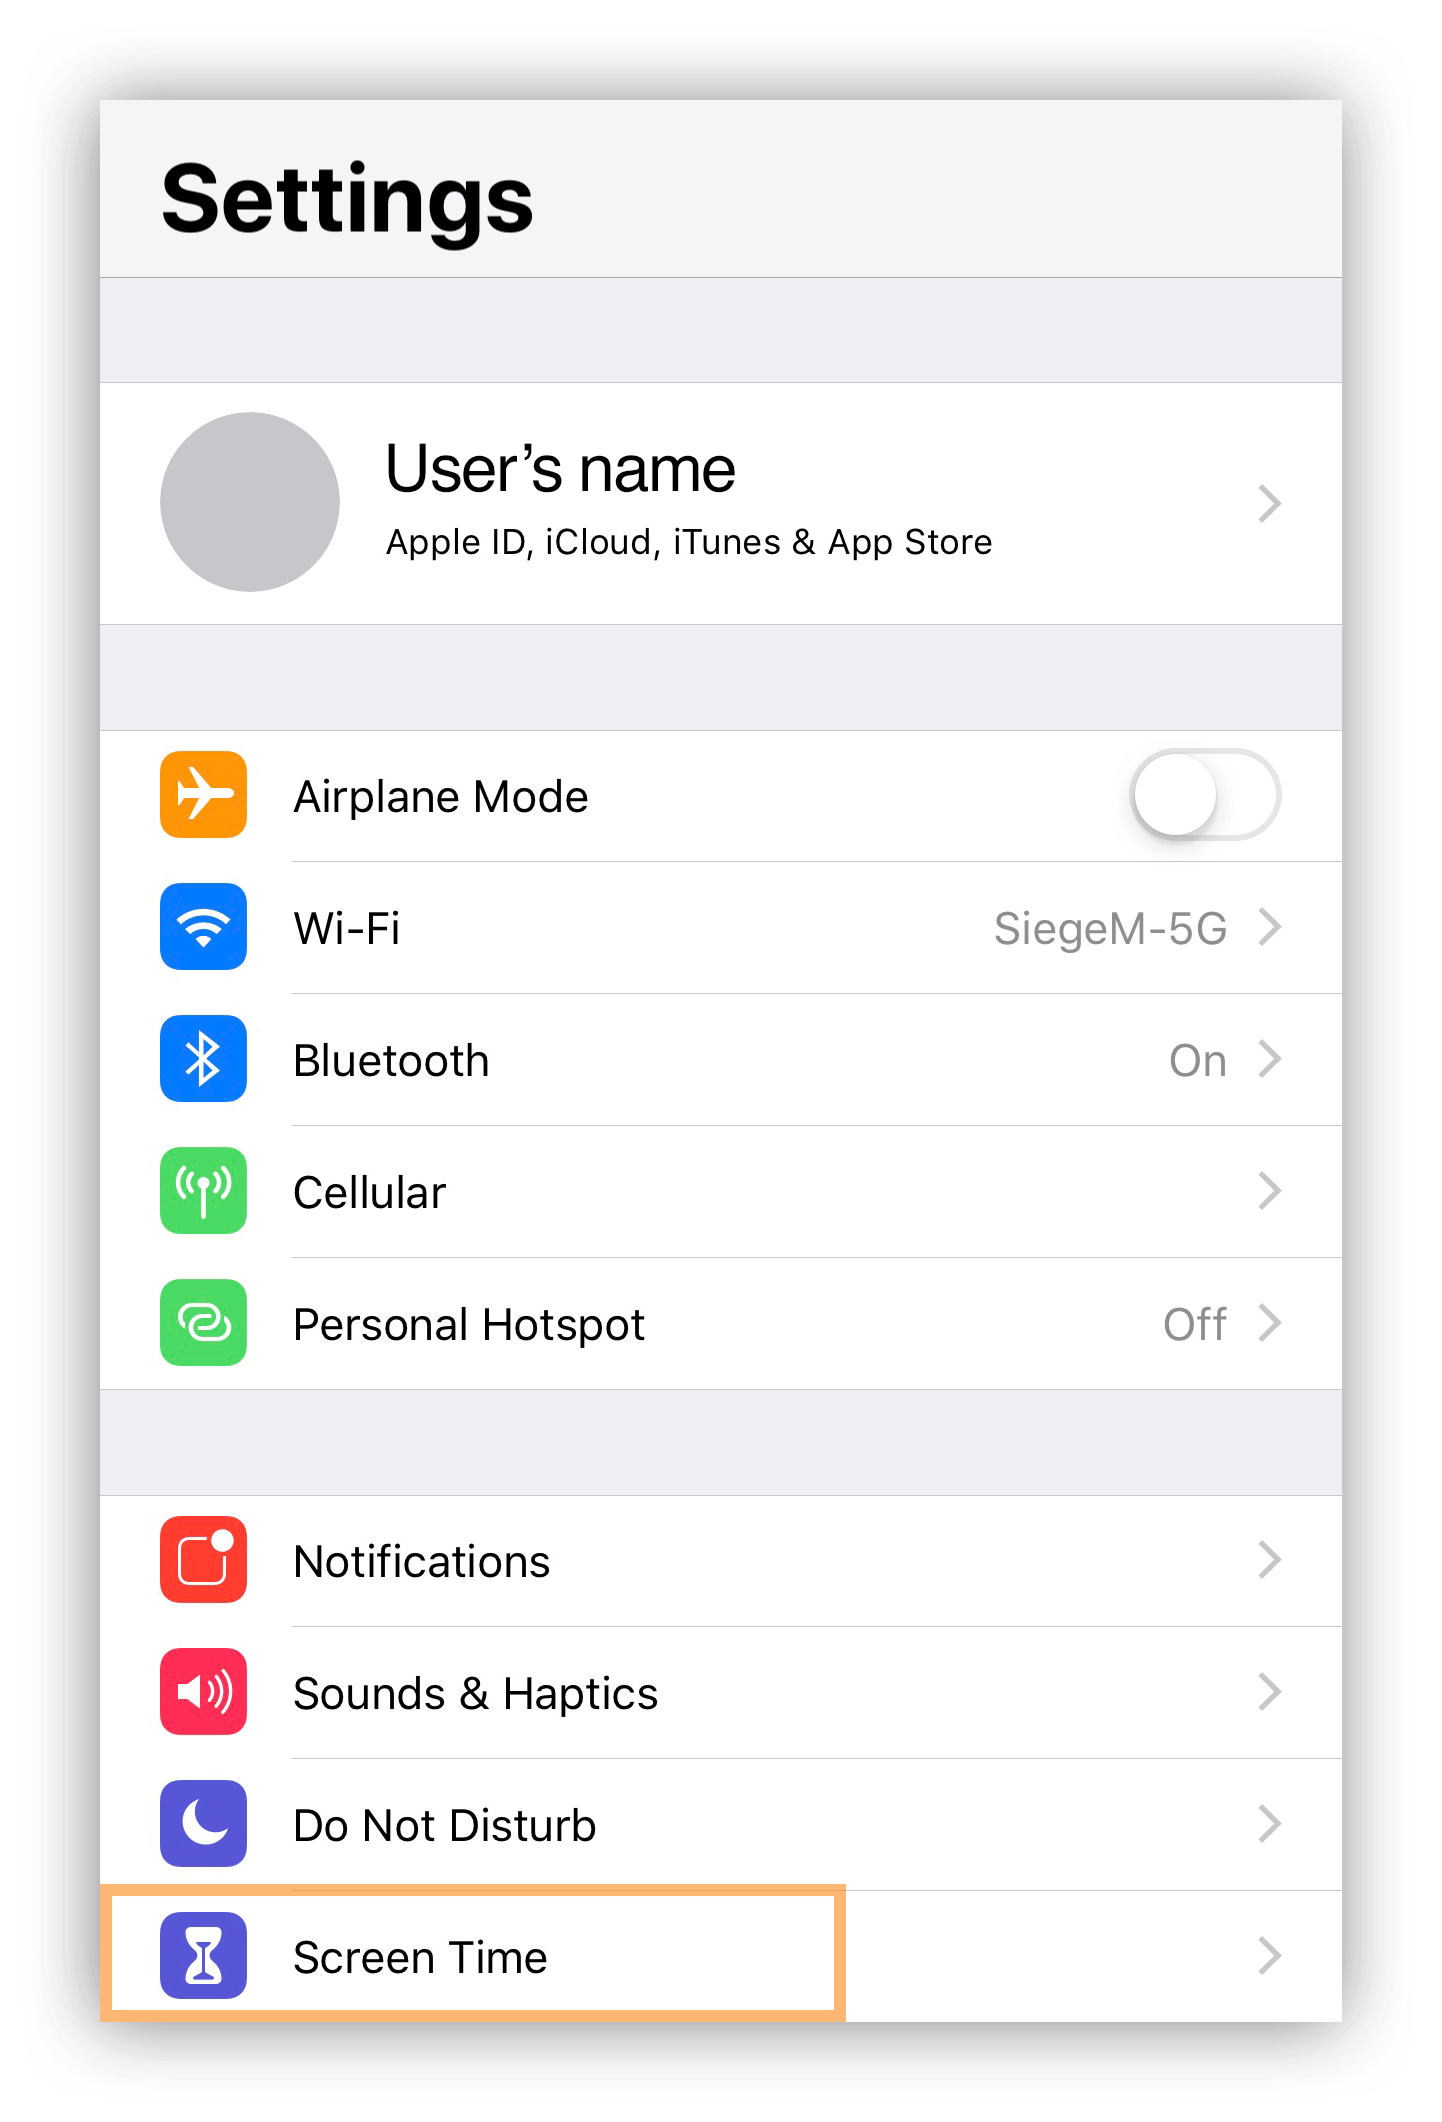
- Go to Settings and tap Screen Time.
- Tap Continue, then select Use Screen Time Passcode to create a passcode. Re-enter the passcode to confirm.
- Note: If you’re setting up Screen Time on your child’s device, follow the prompts until you get to Parent Passcode and enter a passcode. Then, re-enter the passcode to confirm.
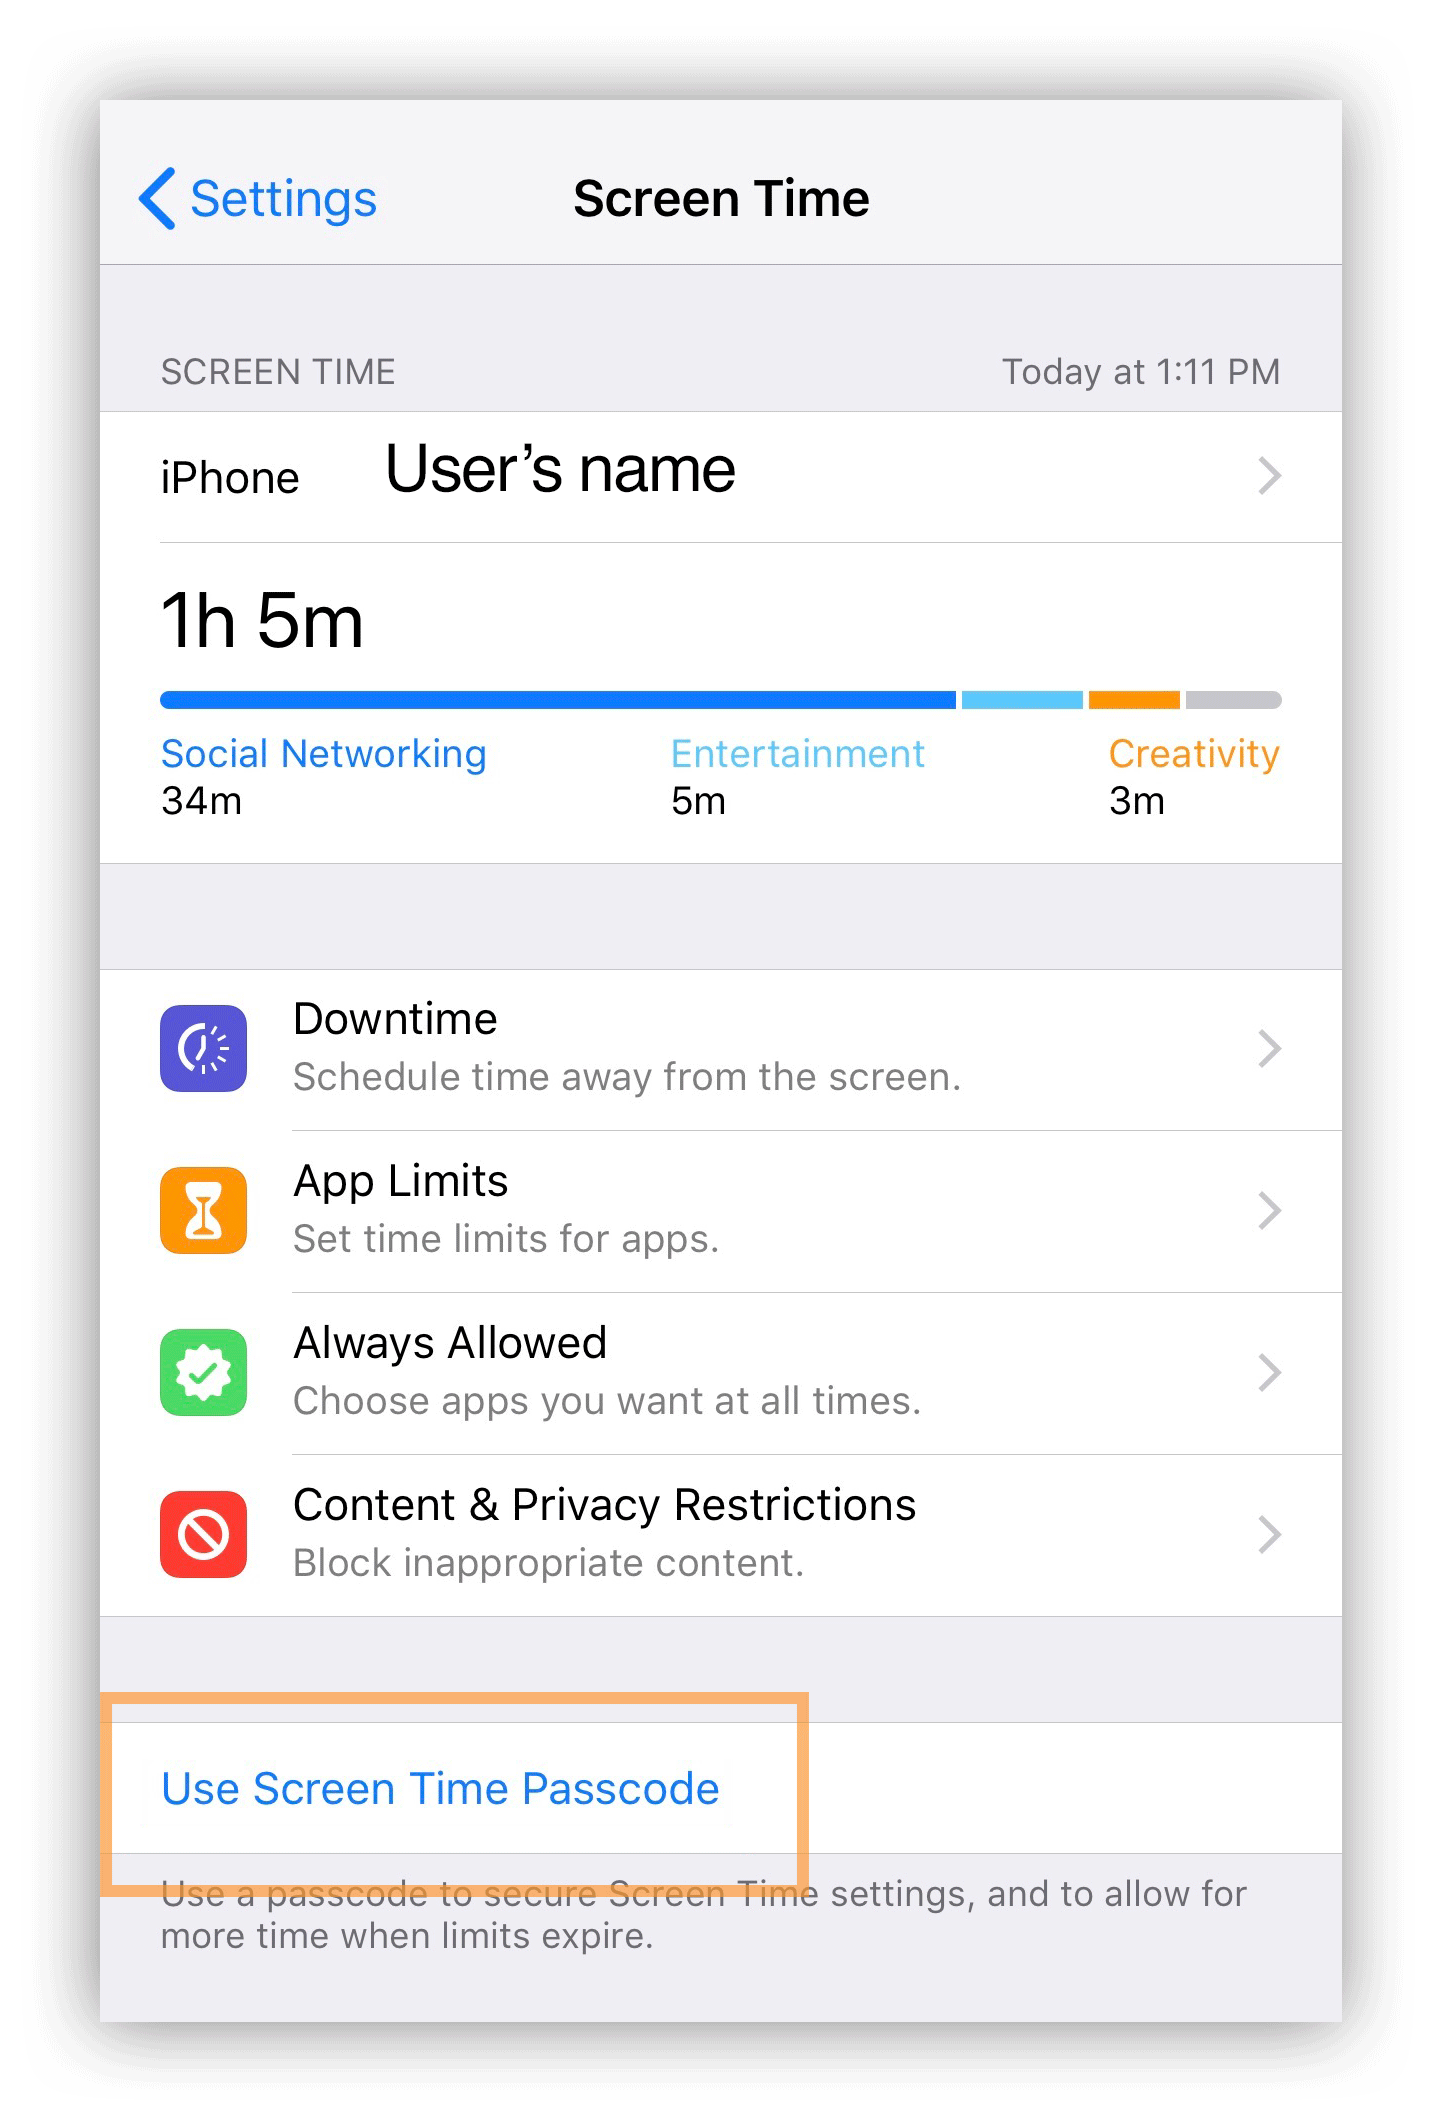
- Note: If you’re setting up Screen Time on your child’s device, follow the prompts until you get to Parent Passcode and enter a passcode. Then, re-enter the passcode to confirm.
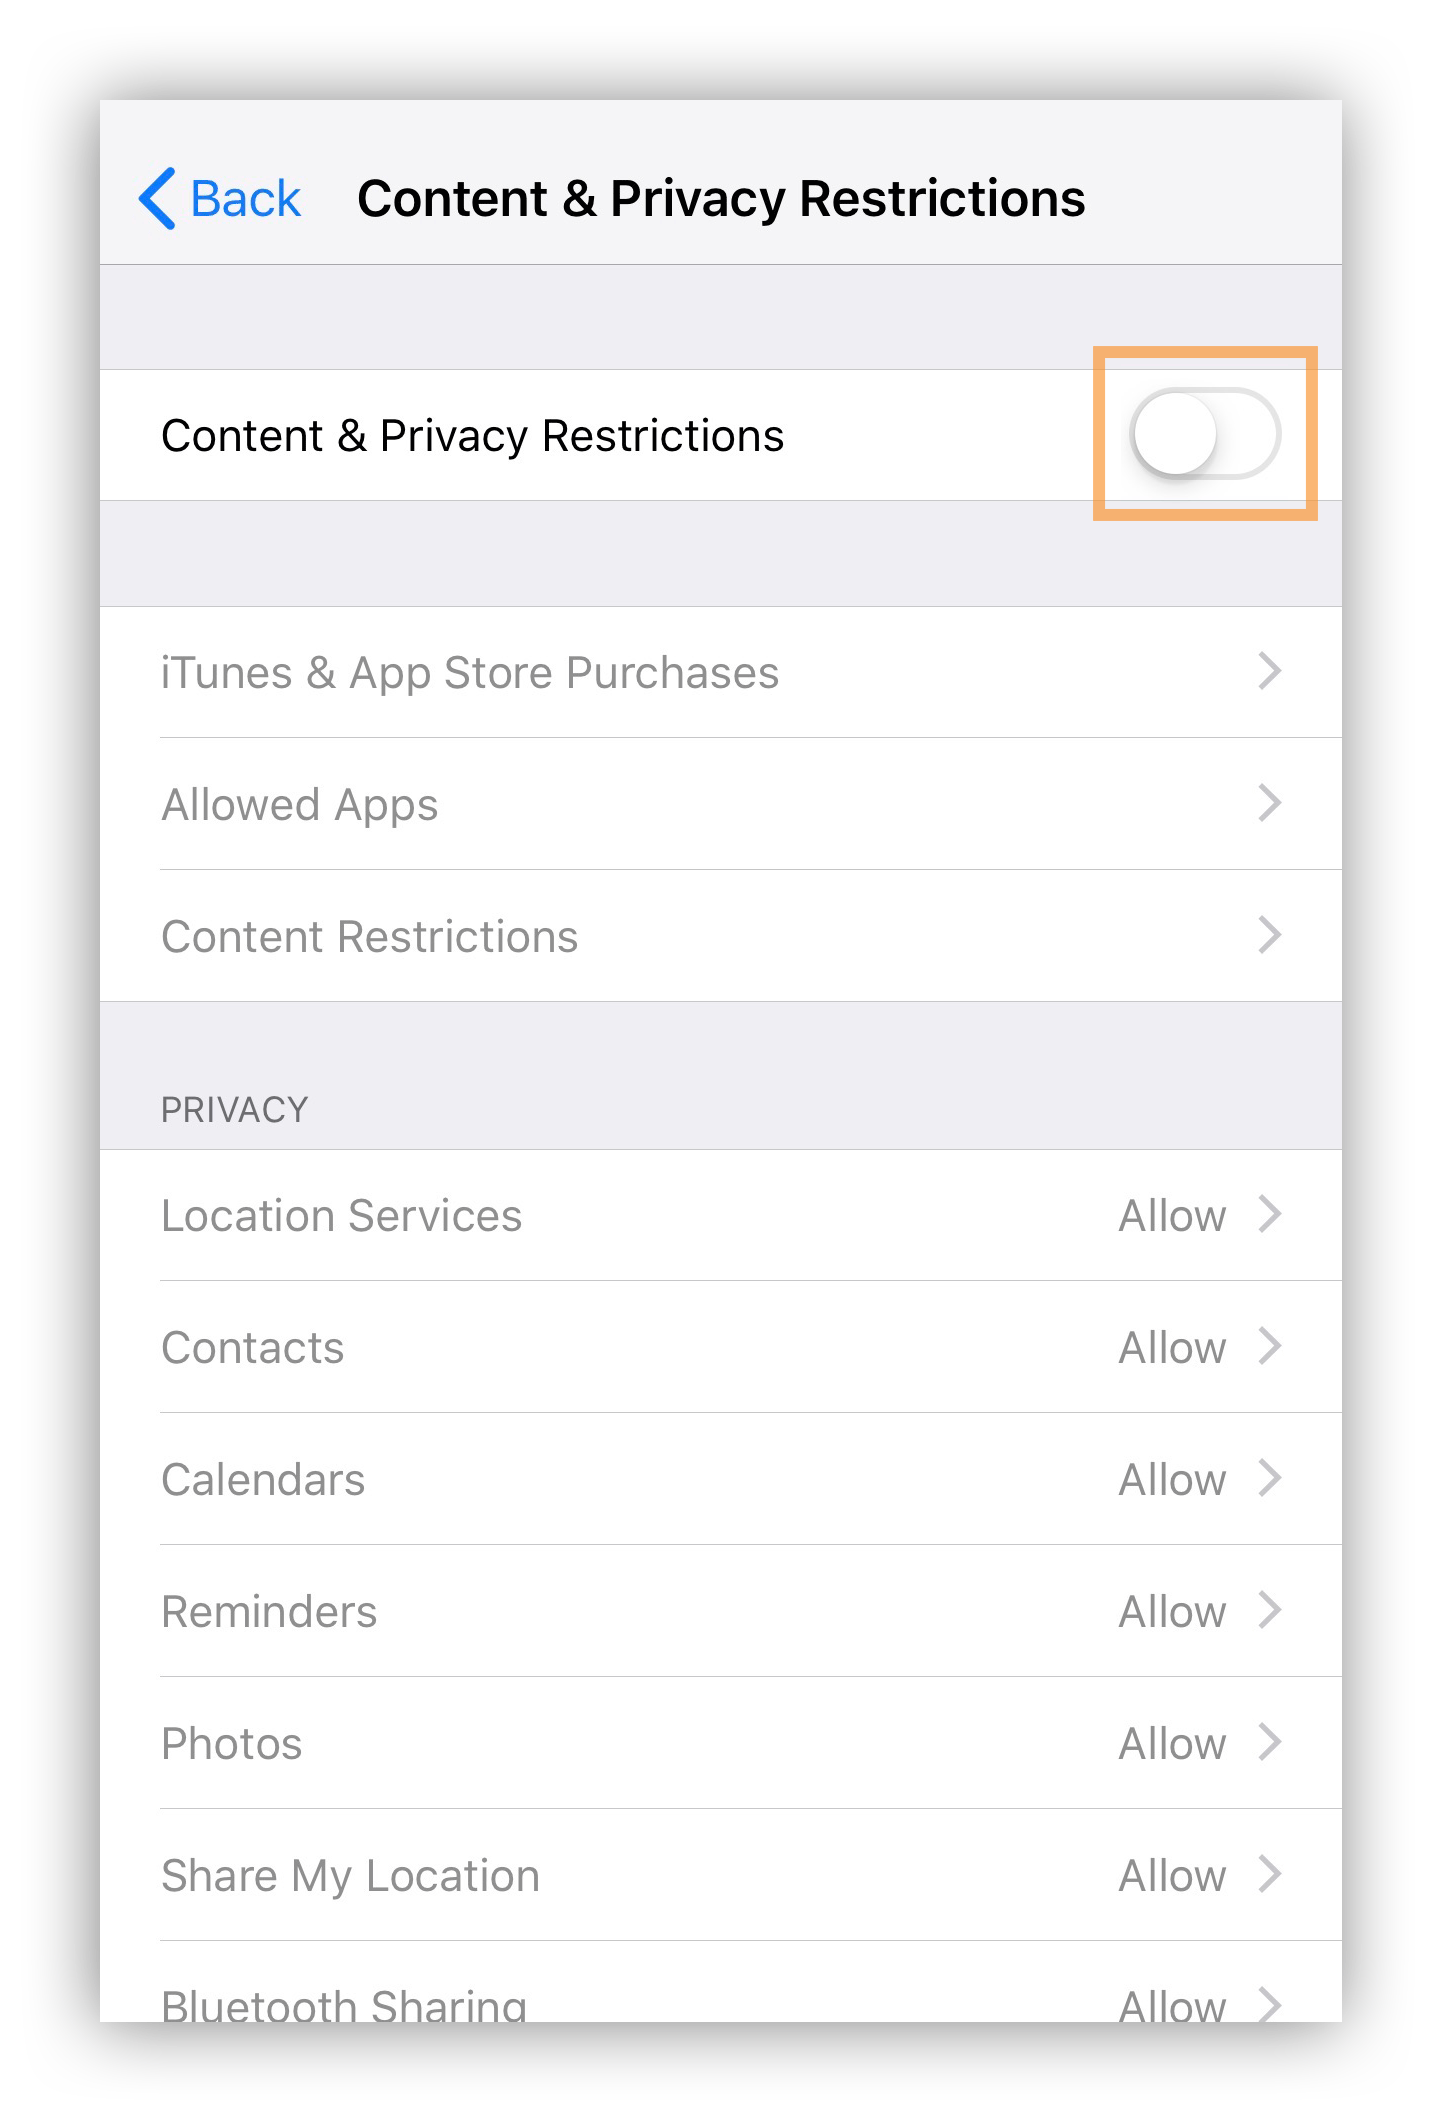
- Tap Content & Privacy Restrictions. Enter your passcode if applicable, then turn on Content & Privacy.
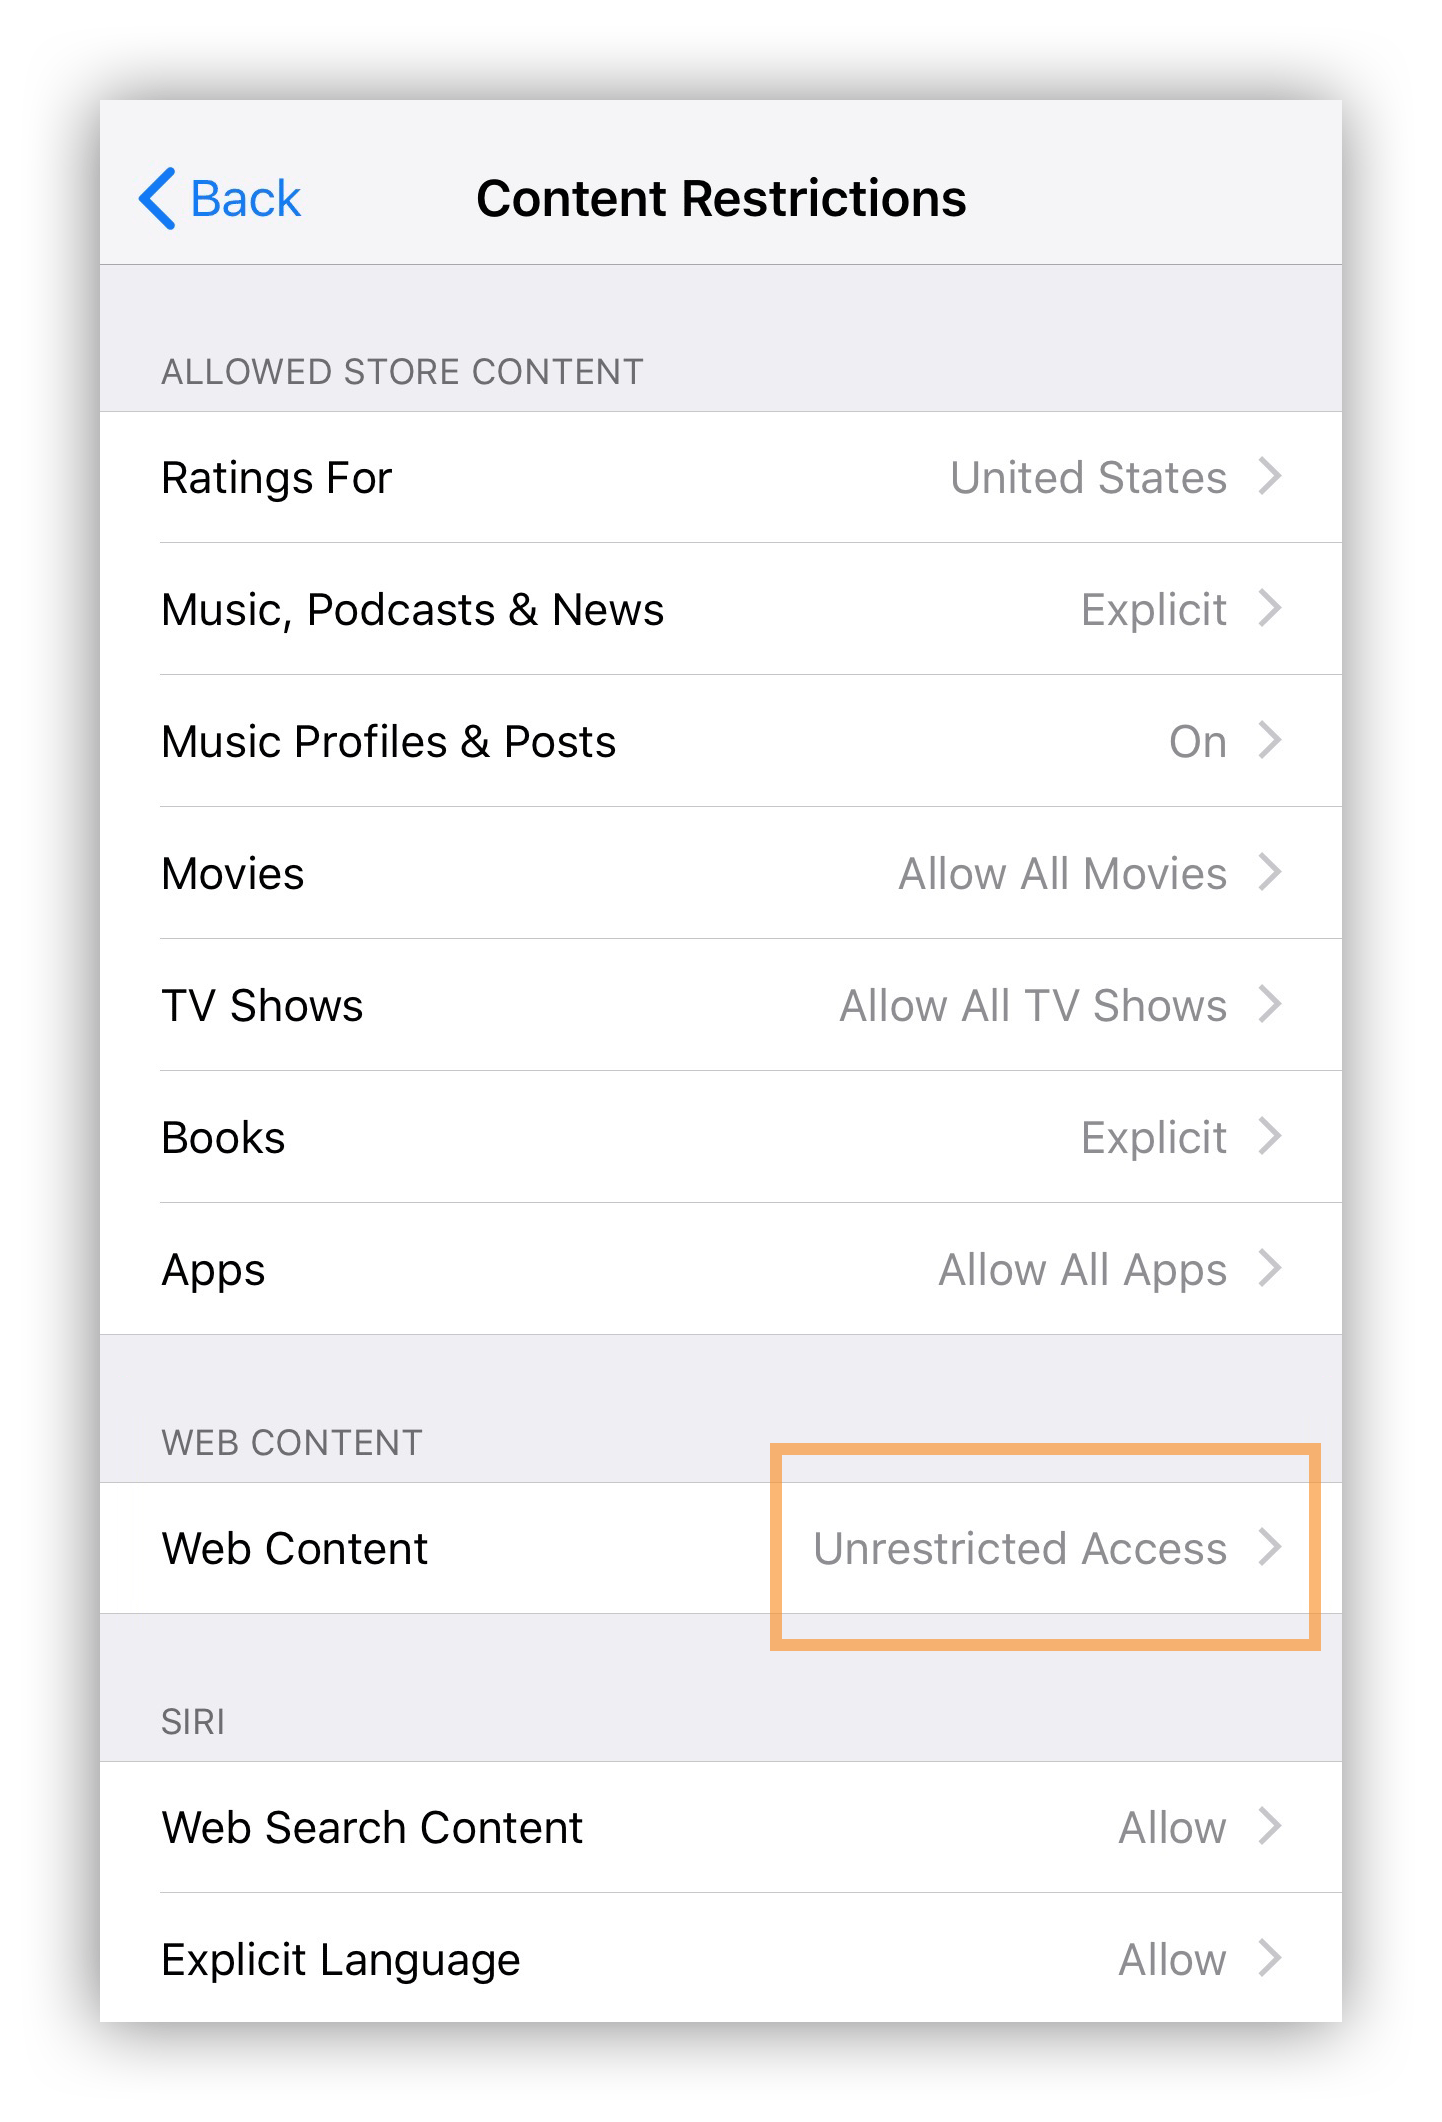
Prevent web content:
- Go to Settings > Screen Time.
- Tap Content & Privacy Restrictions and enter your Screen Time passcode.
- Tap Content Restrictions, then tap Web Content.
- Choose Limit Adult Websites, or Allowed Websites Only.
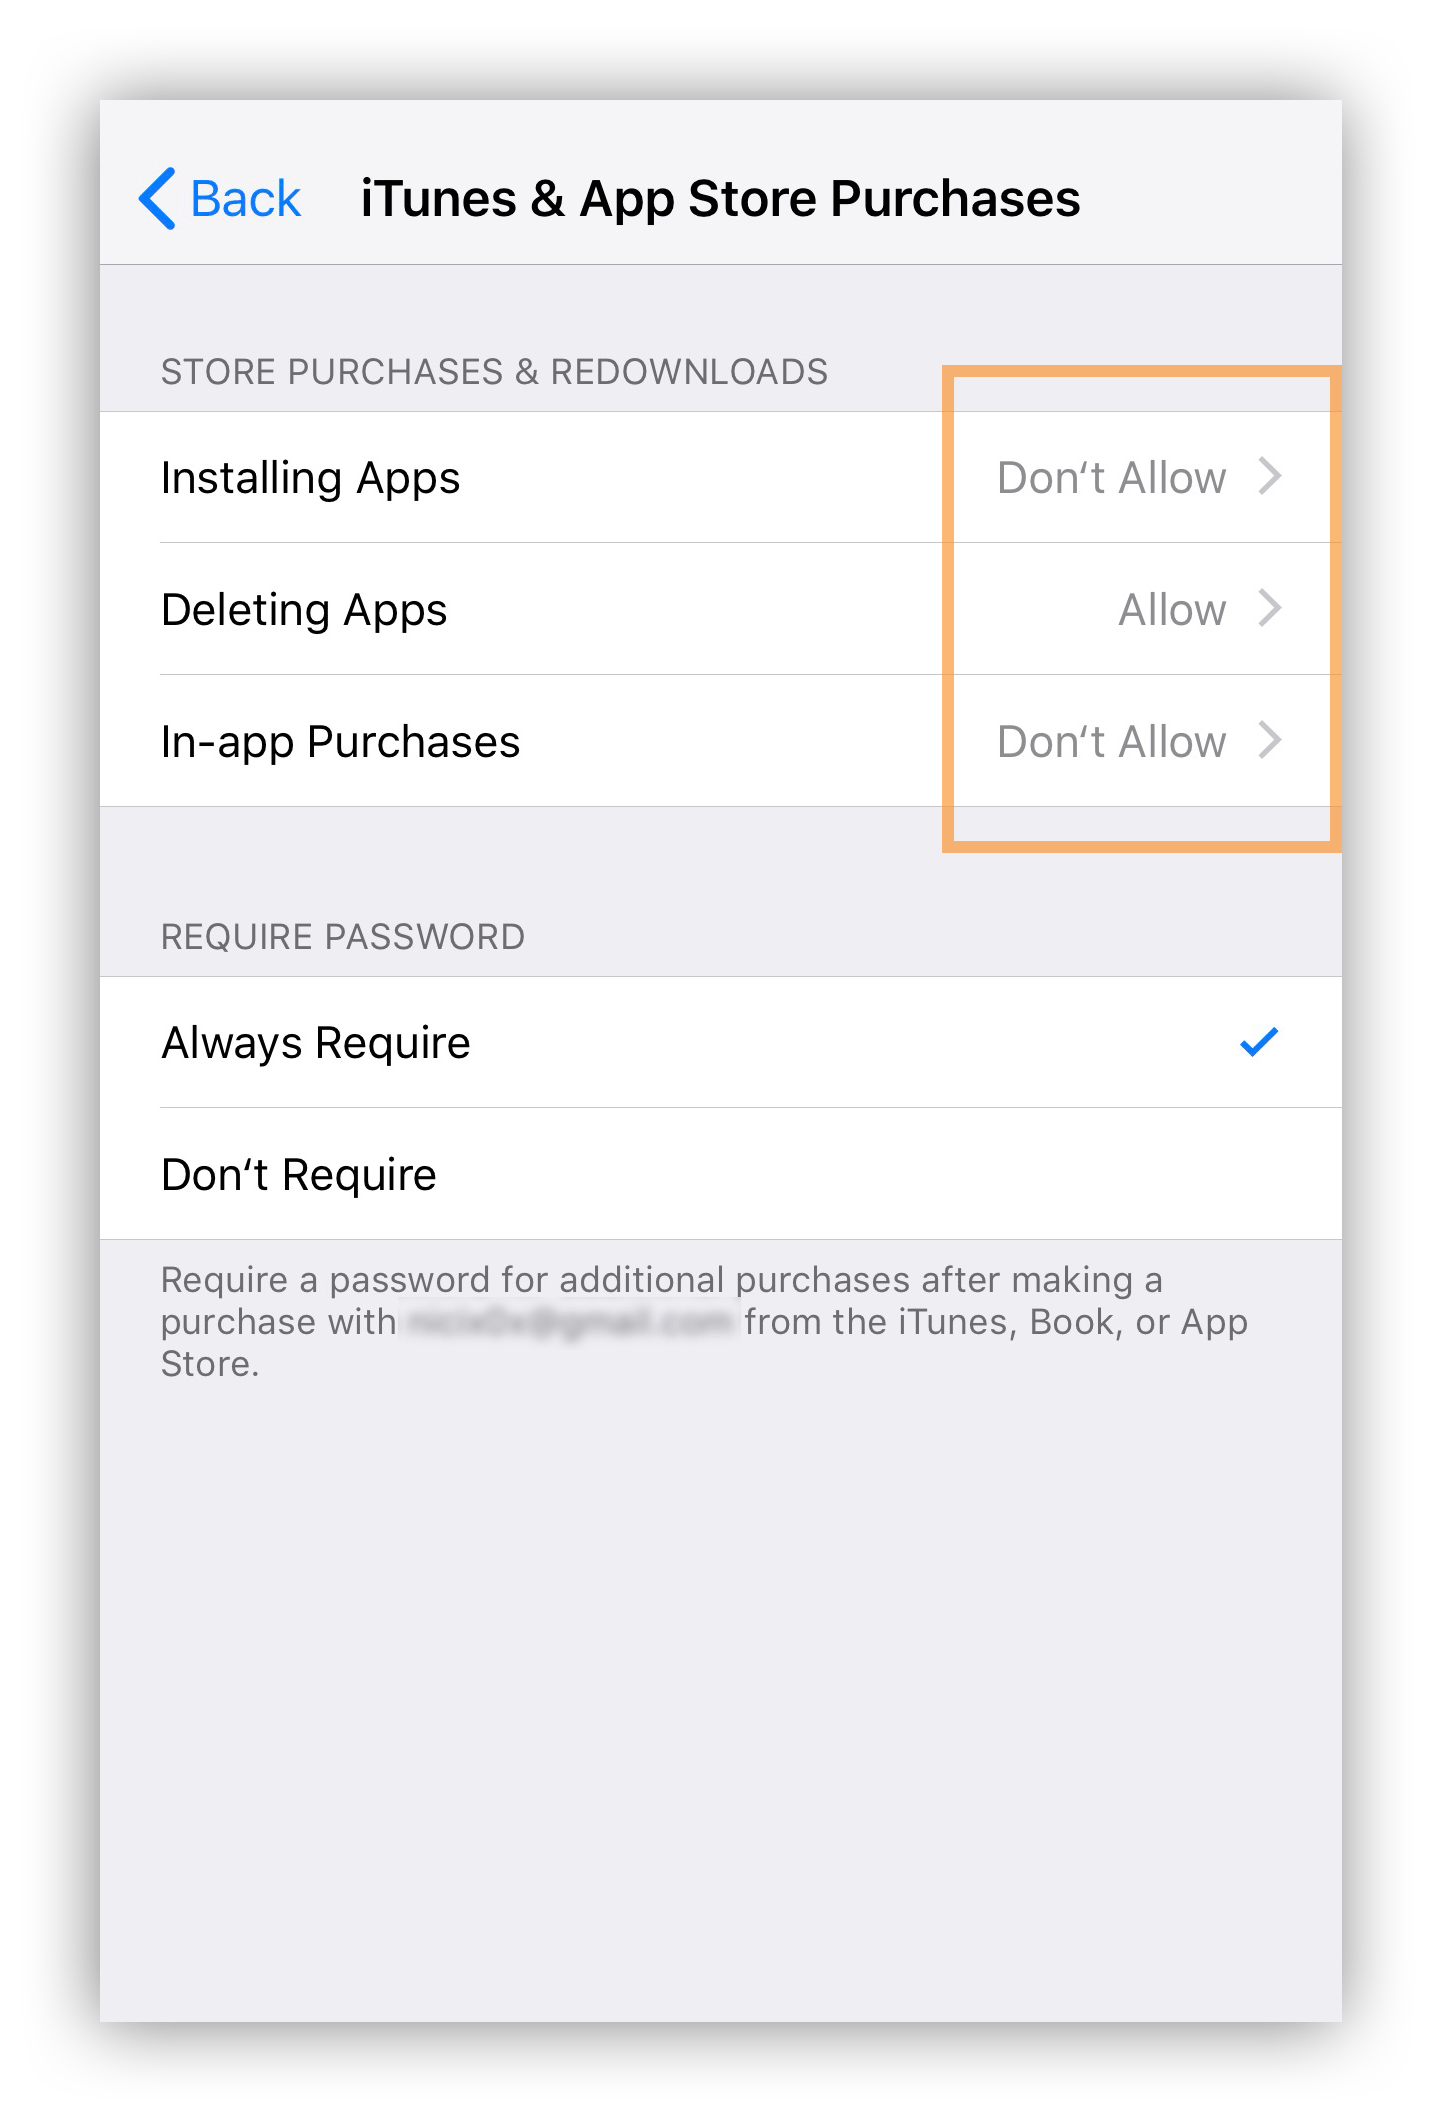
Prevent iTunes & App Store purchase:
- Go to Settings > Screen Time.
- Select Content & Privacy Restrictions. If prompted, enter your passcode.
- Make your selections on which to Allow under Store Purchases & Redownloads.
- Select Always Require a password.
Prevent explicit content and content ratings:
- Go to Settings > Screen Time.
- Tap Content & Privacy Restrictions, then choose Content Restrictions.
- Choose the settings you want for each feature or setting under Allowed Store Content.
Learn more at Apple Support
Android
- Sign in with your own Google account or use their account if they have one.
- Launch the Play Store app and tap the three horizontal lines at the top left.
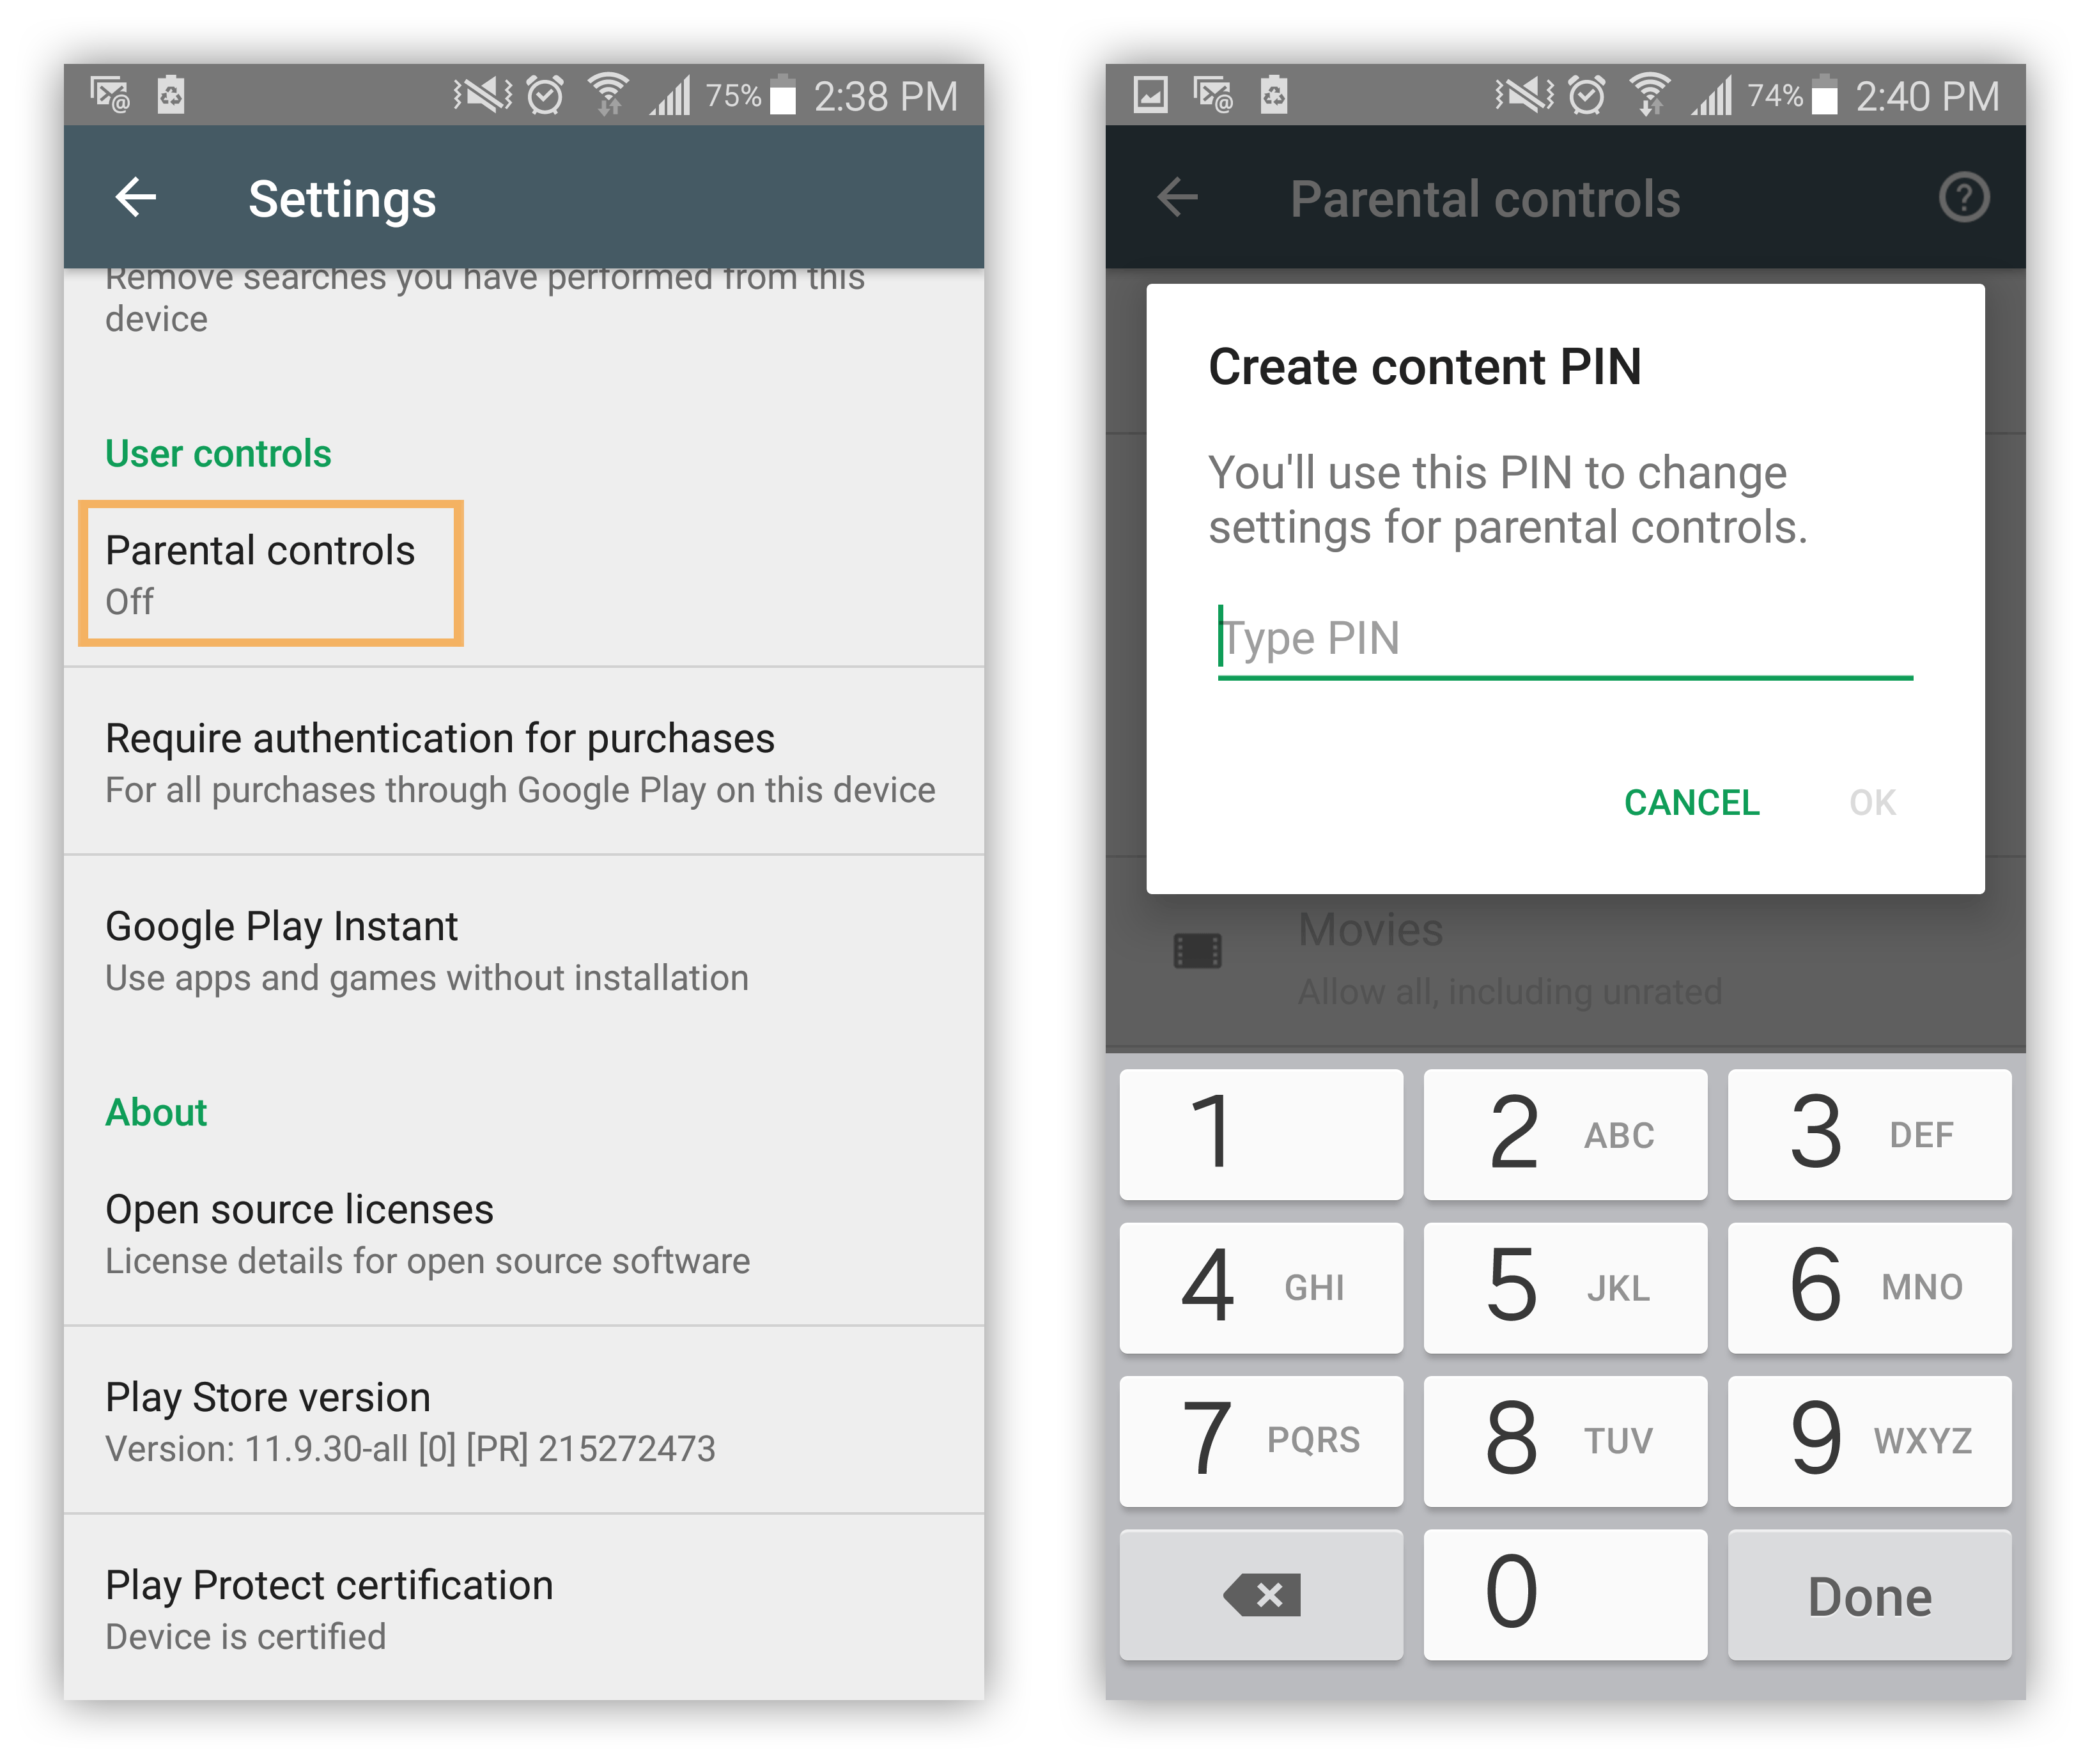
- Scroll down and select Settings, and scroll until you see Parental controls.
- Tap the Parental controls and create a PIN code. Re-enter the PIN.
- The setting will be turned on and you can then tap each category to set how restricting you’d like each category to be.
Use Family Link:
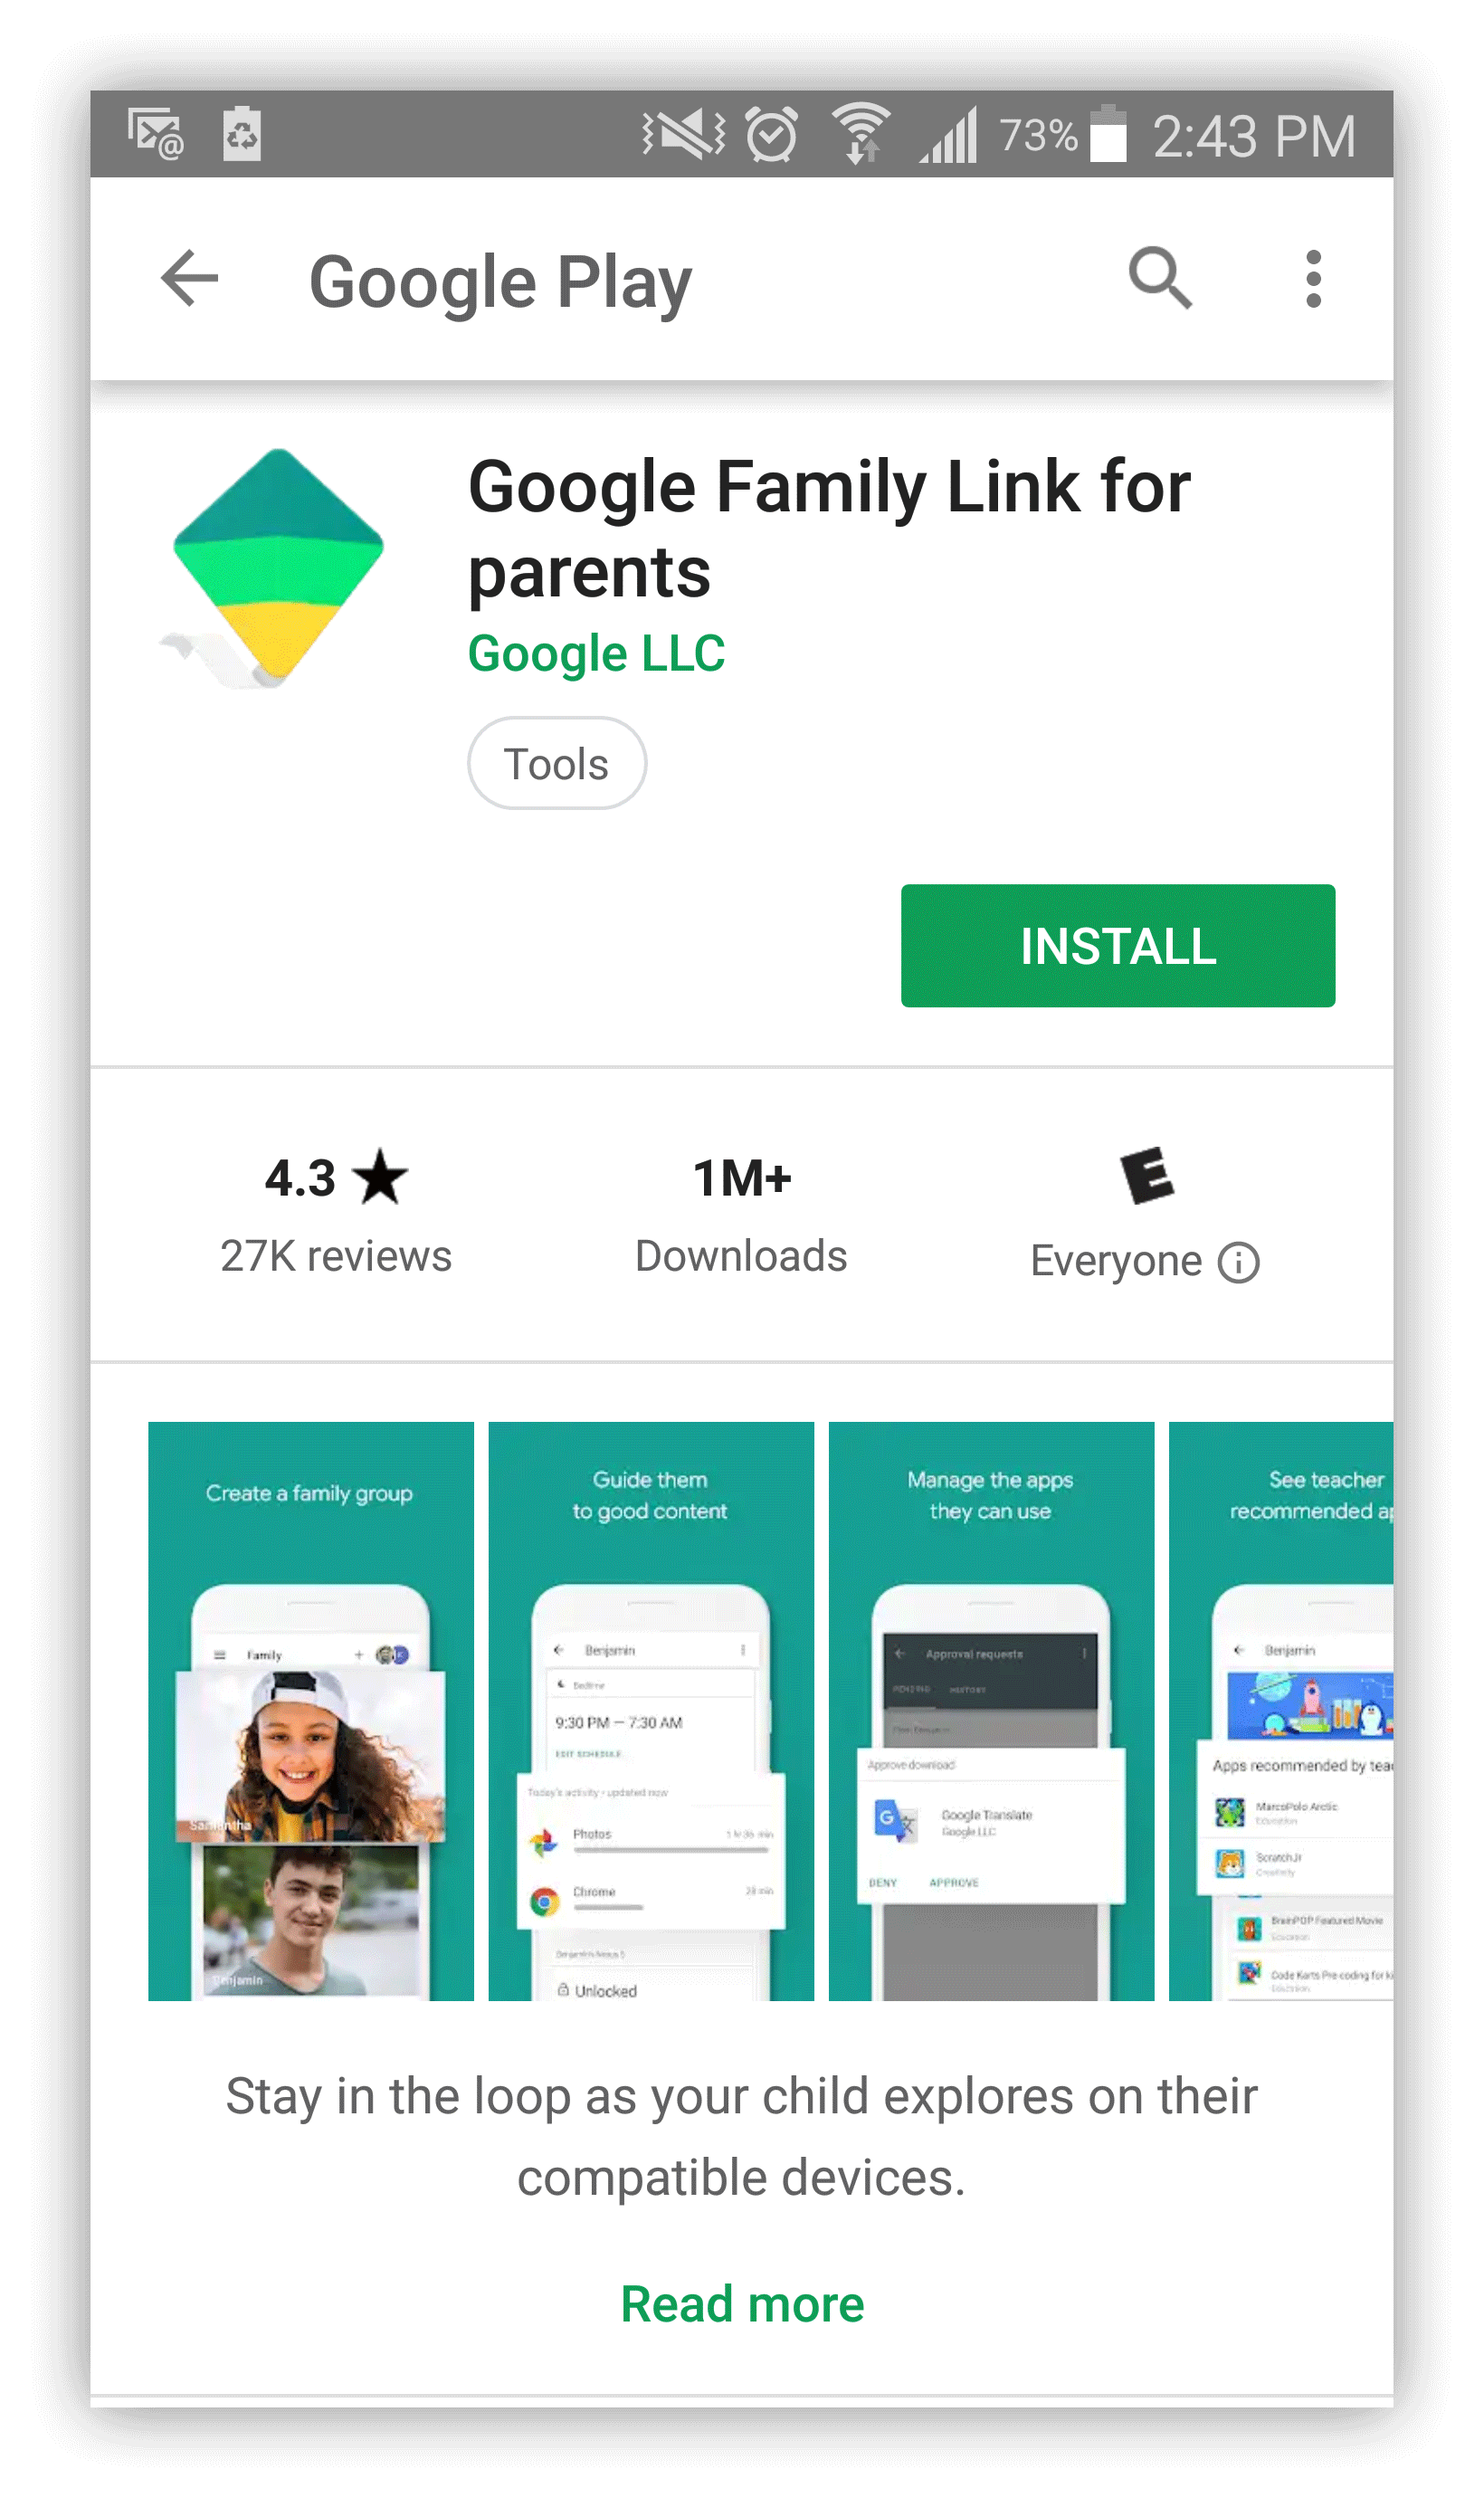
- Download the Family Link app on your device.
- Launch the app and select Get Started.
- Choose Start on the Set up Family Link screen and follow the prompts to progress through the setup.
- Answer a few questions about whether your child has a compatible device and select that you want to create a child’s account and to start a family group.
- Enter your child’s first and last names and press Next.
- Add their birthday and gender, then press Next.
- Choose a Gmail username and press Next.
- Then add a password and press Next.
- Agree to the Terms and Conditions and add credit card information.
- To add the account on your child’s device, start by turning on their phone and signing in using their account.
- Then enter your own Google password and press Next. Family Link will now be installed on your child’s device.
Note: You can review any apps that have been preinstalled on the phone to decide if they should be allowed to use them
Note: Below the Parental controls master switch there is a summary of which restriction is set for each type of content.
Learn more at Google Play Support
Applications to Limit What Your Child Can Search Online
You can install multiple applications on your device and your kids’ devices to manage their internet access and limit what they can search and do online. Check out the list of apps and their features below:
- Qustodio: Qustodio allows you to track online activity, filter web content, monitor text and calls and block apps. It’s compatible with iPhone, Android, MacOS and Chromebook.
- Bark: Bark allows you to monitor social media activity, emails and texts, filter web content and live track your kids’ online activity on most smart devices.
- FamilyTime: FamilyTime allows you to restrict internet access, schedule web browsing and remotely lock your child’s device. It’s compatible with Android and Apple devices and can link up to five accounts.
Net Nanny: Net Nanny allows you to track your child’s location, alerts you when your kids attempt to access blocked websites and offers live monitoring of your child’s online activities. While it’s compatible with most smart devices, it does not allow you to track social activity, calls or texts.
Use Panda Security’s Parental Control Apps
The final step you can take to secure your child’s online activity is with a parental control app. In the world of electronic devices, it adds a level of protection to keep your child safe.
Panda Dome Family helps you keep your child safe while spending time online. It allows system administrators to prevent users from accessing websites that contain unwanted content. It also features a GPS tracking system so you can always know where your children are. It can additionally block unwanted calls and allow parents/adults to block access to certain apps.

Sources:
Technobezz | Lifewire | Netflix | Techwiser | Huffington Post | PC Mag | Tech Advisor |